AI Agent 實作環境建置
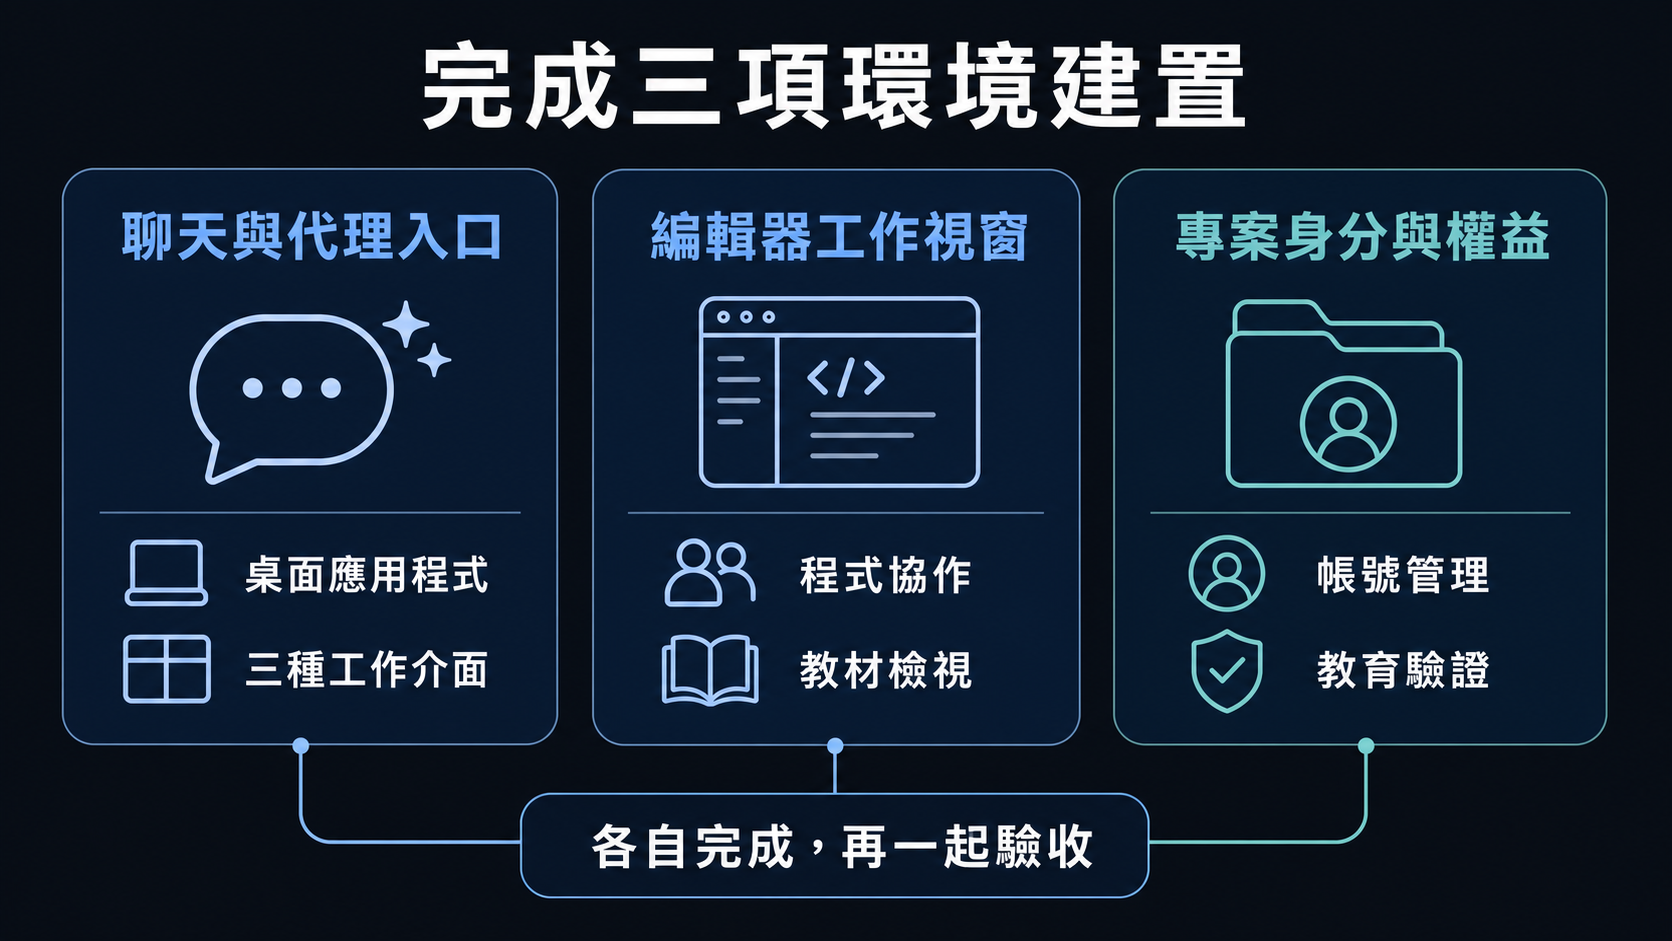
本模組聚焦在 Windows 11 筆電上,把「跟 AI Agent 協作」所需的三個部分準備好:先安裝並設定 ChatGPT 桌面 app(Chat、ChatGPT Work、Codex 三種工作介面);再把 VS Code 裝好對應的擴充套件;最後申請個人 GitHub 帳號並送出 GitHub Education 驗證。三個部分彼此獨立,可以照自己的步調完成,最後再一起驗收。
學習目標 (Learning Objectives)
完成本模組後,學員應能:
- 安裝並登入 ChatGPT 桌面 app,依任務性質選擇 Chat、ChatGPT Work 或 Codex 三種工作介面。
- 用一句提示語請 Codex 自動安裝 VS Code,以及 Codex、GitHub Copilot、Claude Code 三個 AI Agent 擴充套件,讓 AI 能直接在編輯器裡協助讀寫、審查程式碼。
- 同樣請 Codex 自動安裝 Python、JavaScript、HTML 的語法標示,Markdown、CSV、JSON 的檢視與簡易編輯,以及 MS Office 文件(docx/xlsx/pptx)的直接預覽套件,不需手動逐一安裝,也不用切換到其他應用程式就能檢視教材。
- 申請個人 GitHub 帳號,並送出 GitHub Education(教師/Global Campus)驗證申請。
- 依 checklist 自行驗證三個部分是否設定完成,並排除常見問題。
先備條件 (Prerequisites)
| 項目 | 說明 |
|---|---|
| 個人筆電 | Windows 11,具系統管理員(安裝軟體)權限 |
| 網路 | 可連線下載安裝套件、註冊帳號與存取 AI 服務 |
| ChatGPT 帳號 | 可使用 Codex 的 ChatGPT 帳號;若還沒有,可在官網或桌面 app 首次啟動時建立 |
| Email 信箱 | 建議使用學校網域信箱,註冊 GitHub 帳號與申請 GitHub Education 時會用到,有助於加快教師身分驗證 |
| 基本操作 | 能開啟並操作瀏覽器;在 Codex 提出安裝指令時,能逐步檢視並核准 |
最低電腦需求 (Minimum Computer Requirements)
本模組只需同時開啟 VS Code、ChatGPT 桌面 app 與瀏覽器,需求比完整開發工具鏈輕。標示「建議」者為較順暢的體驗門檻。
| 項目 | 最低需求 | 建議 |
|---|---|---|
| 作業系統 | Windows 11 (64 位元) | Windows 11 且更新至最新版 |
| 處理器 | 64 位元 x64 雙核心 | 四核心以上 |
| 記憶體 (RAM) | 8 GB | 16 GB |
| 可用磁碟空間 | 5 GB | 10 GB 以上 |
| 權限 | 具系統管理員權限 (可安裝軟體、允許 UAC) | 同左 |
| 網路 | 穩定寬頻,可存取 GitHub 與 AI 服務 | 同左 |
| 瀏覽器 | Microsoft Edge 或 Chrome | 同左 |
8 GB 記憶體可完成本模組所有任務,但 VS Code、瀏覽器與 ChatGPT 桌面 app 一起開啟時,16 GB 會比較順暢。
三個部分總覽 (Overview of the Three Parts)
本模組要完成的三件事彼此獨立,可以照自己的步調依序完成:
| 部分 | 涵蓋內容 |
|---|---|
| 第一部分:ChatGPT App | 安裝 ChatGPT 桌面 app,登入後熟悉 Chat、ChatGPT Work、Codex 三種工作介面的差異與切換時機 |
| 第二部分:VS Code + 擴充套件 | 請 Codex 自動安裝 VS Code,加裝 Codex、GitHub Copilot 與 Claude Code 三個 AI Agent 擴充套件,以及 Python/Markdown/HTML 語法標示、CSV/JSON 檢視編輯,與 MS Office 文件預覽套件 |
| 第三部分:GitHub 帳號 + GitHub Education | 註冊個人 GitHub 帳號,送出 GitHub Education(教師)驗證申請,取得後續課程與工具的教育版權益 |
第一部分:安裝與設定 ChatGPT App (Chat / Work / Codex)
ChatGPT 桌面 app 是 Windows 上進入 Chat、ChatGPT Work 與 Codex 三種工作介面的共同入口。
| 工具 | 官方下載/說明 | 建議指令或操作 |
|---|---|---|
| ChatGPT 桌面 app | OpenAI:ChatGPT desktop app for Windows | 點官方連結,在 Microsoft Store 頁面按「安裝」。安裝後開啟 app,使用 ChatGPT 帳號登入。 |
這是本模組唯一需要手動安裝的軟體:在 Codex 出現之前,還沒有 AI Agent 可以代勞。安裝好、登入後,第二部分開始的每一項安裝都會改由 Codex 自動執行。
登入後,依任務性質選擇正確的工作介面:
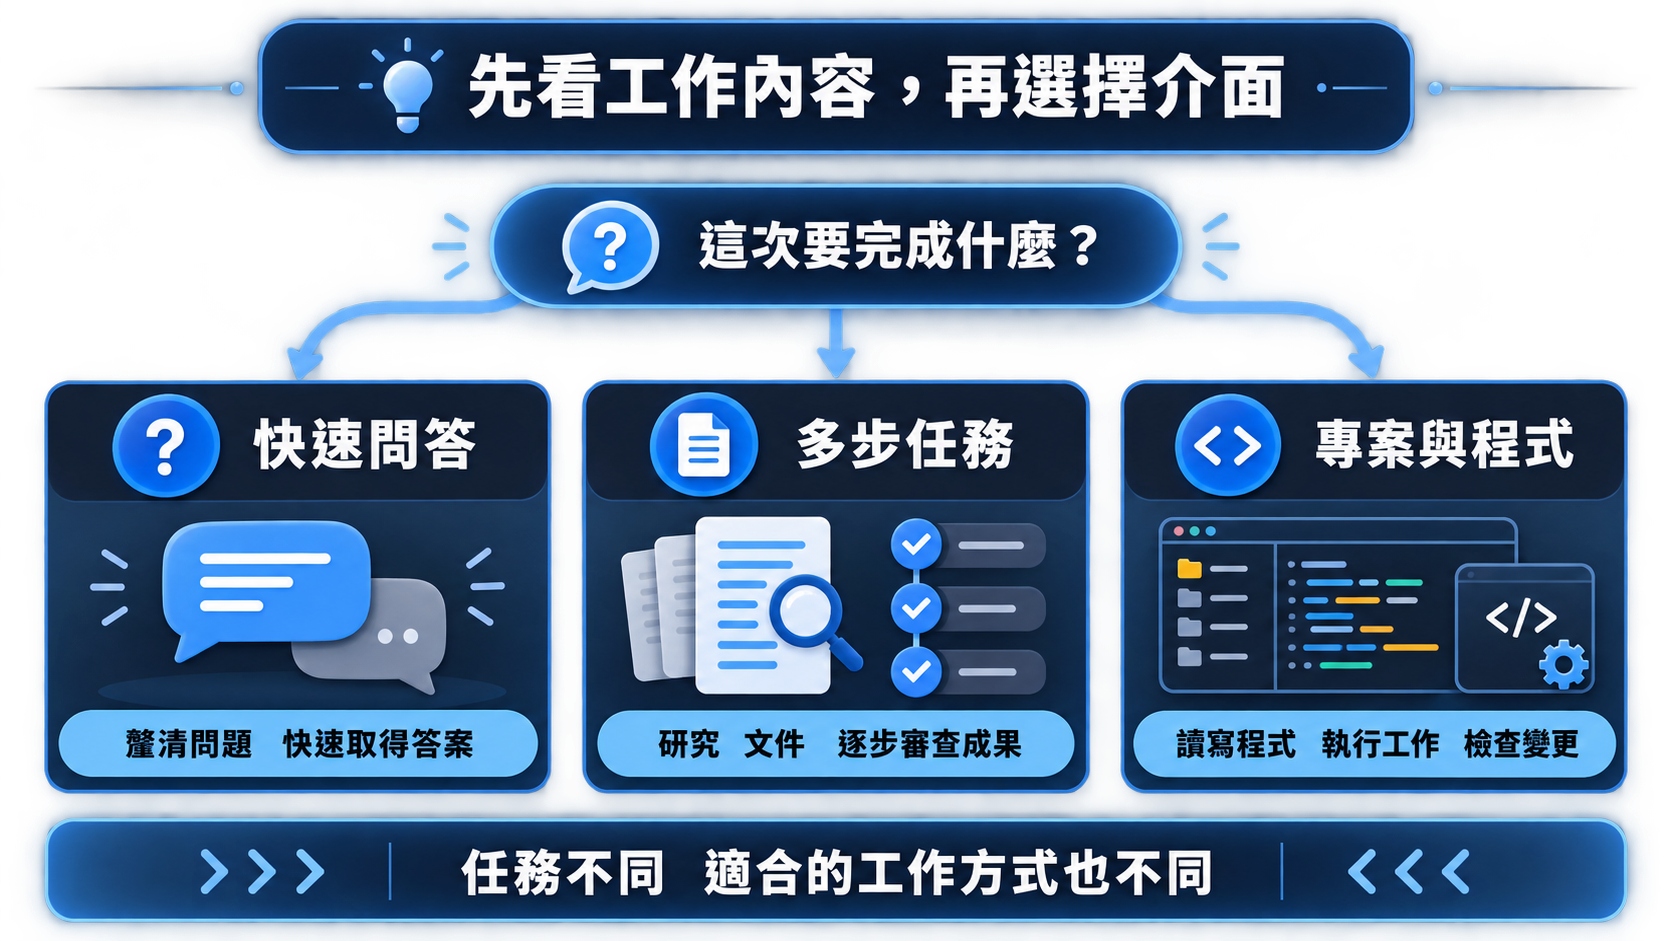
- 需要快速問答時選 Chat。
- 要完成研究、文件或需要審查的多步驟成果時,先選 ChatGPT,再切換到 Work。
- 要處理課程 project、程式碼、指令與 diff 時,從產品選單選 Codex。
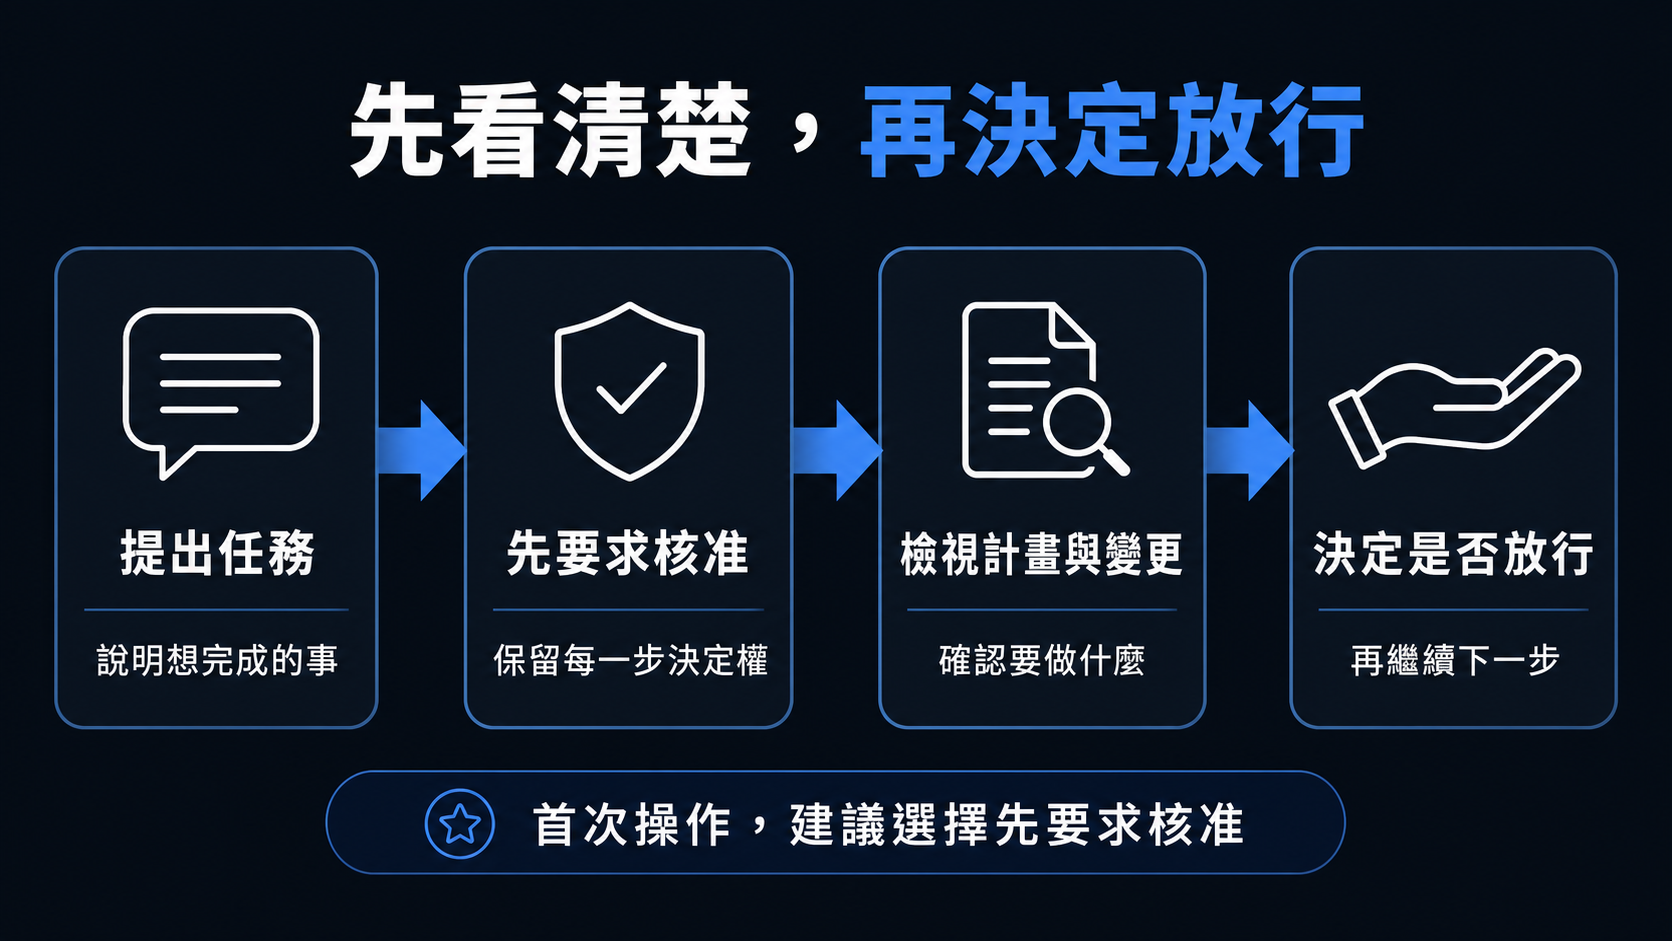
⚠️ 在 Codex 送出第一個任務前,先選先要求核准(Ask for approval),不要一開始就打開完整存取權(Full access),這樣才能在每一步都看清楚 Agent 打算做什麼、產生了哪些變更,再決定要不要放行。
驗收:執行 guided「Hello, AI Agent」任務(請 Codex 在專案資料夾建立一個 hello.txt),確認 AI Agent 能接收指令、產生檔案並回報結果。
第二部分:VS Code 與擴充套件
VS Code 是之後操作 AI Agent 的主要工作視窗。這一部分不需要自己動手安裝——直接請第一部分裝好的 Codex 代勞:開一個新的 Codex 工作階段,貼上下面的提示語,逐步檢視並核准它要執行的每個指令即可。
請幫我安裝「Visual Studio Code」這套免費軟體。

安裝好以後,請再幫我加裝好用的小功能,讓我可以:
一、使用 Codex、GitHub Copilot、Claude Code 這幾個 AI Agent 工具
二、閱覽、也能簡單編輯 HTML、Markdown、CSV、JSON,以及 Word、Excel、PowerPoint 這類 Office 文件
三、閱讀常見的程式語言(例如 Python、JavaScript、HTML)時,自動用顏色標示關鍵字和其他重點,方便閱讀

每一個步驟開始之前,請先用簡單的話告訴我你接下來要做什麼,等我回覆「好」或「確認」以後再繼續。全部弄完以後,幫我整理一份清單,清楚告訴我哪些弄成功了、哪些沒有成功。
上面提到的功能,實際上是安裝以下這些項目做到的:
| 用途 | 擴充套件 | Marketplace ID |
|---|---|---|
| Codex 編程代理 | Codex(OpenAI 的程式協作擴充套件,與桌面 app 共用登入) | openai.chatgpt |
| GitHub Copilot | 程式碼自動完成與 Copilot Chat | GitHub.copilot |
| Claude Code | Anthropic 的程式協作擴充套件 | anthropic.claude-code |
| Python 語法標示 | Python(Microsoft 官方擴充套件) | ms-python.python |
| JavaScript/TypeScript 語法標示 | VS Code 內建,不需另外安裝 | — |
| HTML 語法標示 | VS Code 內建,不需另外安裝 | — |
| Markdown 語法標示與預覽 | Markdown All in One | yzhang.markdown-all-in-one |
| HTML 網頁即時預覽 | Live Preview(Microsoft 官方擴充套件) | ms-vscode.live-server |
| CSV 檢視與簡易編輯 | Rainbow CSV | mechatroner.rainbow-csv |
| JSON 檢視與簡易編輯 | VS Code 內建,不需另外安裝 | — |
| MS Office 文件預覽(docx/xlsx/pptx) | Office Viewer | cweijan.vscode-office |
⚠️ 擴充套件 ID 會隨 Marketplace 更新而變動。若 Codex 回報某個 ID 安裝失敗或找不到,請它先到 Marketplace 搜尋正確名稱、確認目前的 ID 再重試,尤其是 Claude Code、CSV、Office 文件預覽這幾款較新或較小眾的套件。
驗收:開啟 Extensions 視窗確認上述套件都已安裝並啟用;再分別開啟一個 .py、.md、.html、.csv、.json,以及一份 .docx 或 .xlsx 檔案,確認語法標示或預覽畫面正常顯示。
替代方案:更多 AI Agent 選擇
本工作坊以 ChatGPT App/Codex 為主,但也介紹兩條可依個人需求選擇的路徑:Google Antigravity,以及通過 GitHub Education 教師驗證後可申請使用的 GitHub Copilot Pro。兩者的功能、方案與可用額度可能調整;安裝或啟用前請以官方頁面的當前資訊為準。
Google Antigravity
Google Antigravity 與 Antigravity IDE 是為開發者提供的 agent-first 產品;官方提供 Windows 版本下載。若選擇先試用這條路徑,仍應從最小任務開始:建立一個測試檔案、檢查預計動作與變更內容,再決定是否允許執行。
| 工具 | 官方下載/說明 | 建議操作 |
|---|---|---|
| Google Antigravity | Google:Antigravity 下載頁面 | 下載 Windows 安裝檔、完成安裝並登入。第一次使用時,先在設定中選擇需要人工確認的執行與變更審查方式。 |
⚠️ 不同 agent 工具的終端機與檔案變更審查設定會不同。第一次使用時,先確認每一項即將執行的指令與變更,再逐步放寬權限。
驗收:在需要人工確認的設定下,請 Agent 建立一個 hello.txt,確認它能接收指令、提出動作、產生檔案並回報結果。
GitHub Copilot(透過 GitHub Education)
完成 GitHub Education 教師驗證後,可依 GitHub 的目前資格規則申請免費 GitHub Copilot Pro。資格與方案會定期重新評估;核准後仍需到 Copilot 設定頁面確認並完成啟用。
| 工具 | 官方下載/說明 | 建議操作 |
|---|---|---|
| GitHub Copilot Pro(教育教師資格) | GitHub Education 教師申請 | 先完成第三部分的教師驗證;若符合資格,在 Copilot 設定頁面確認資格後啟用,再於 VS Code 登入同一個 GitHub 帳號。 |
驗收:教育資格核准後,確認 GitHub 的 Copilot 設定頁面顯示可用資格,並在 VS Code 的 Copilot Chat 完成一次提問或程式碼修改。
第三部分:申請 GitHub 帳號與 GitHub Education
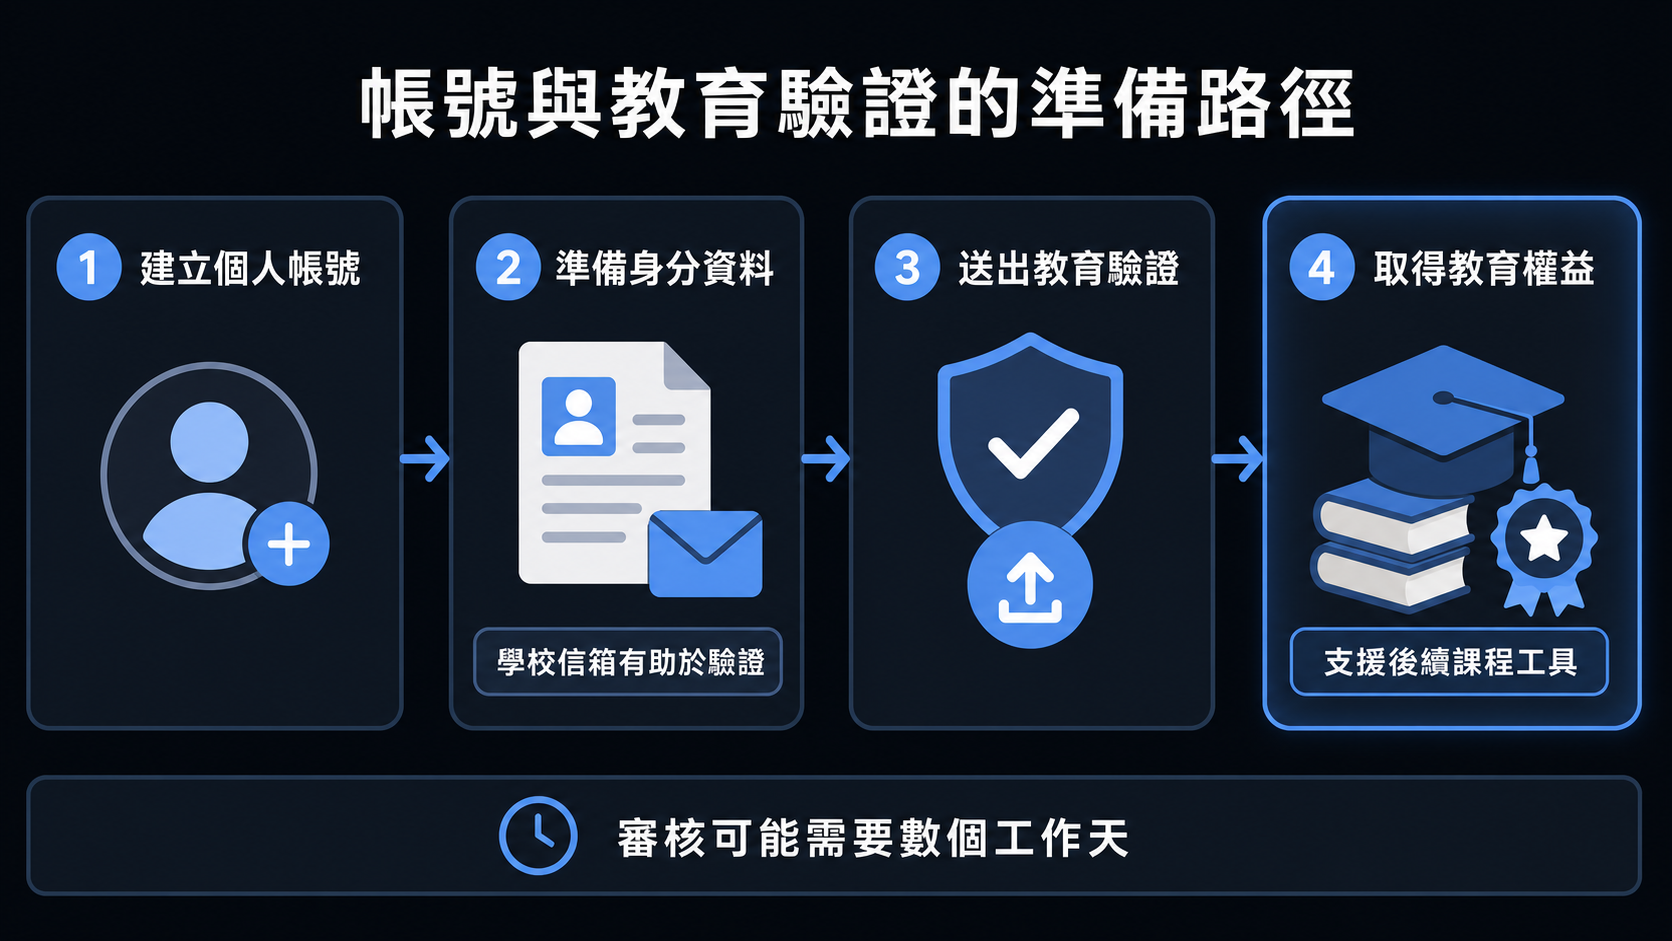
GitHub 帳號是後續課程管理專案、儲存檔案的基礎;GitHub Education 則能讓教師身分取得 Copilot 等工具的教育版權益。
| 步驟 | 說明 |
|---|---|
| 註冊 GitHub 帳號 | 前往 github.com/signup 完成註冊;申請教師權益時,請使用可驗證的學校信箱 |
| 申請 GitHub Education(教師) | 依 GitHub Education 教師申請 指示,在 Education benefits 設定中開始申請,並提供可驗證的學校信箱與任職證明文件 |
| 等待審核 | 等待 GitHub 通知結果;審核期間仍可正常使用 GitHub 帳號,教育權益則在核准後啟用 |
GitHub 目前的教師資格申請需要可驗證的學校信箱與學校關係證明;送出前請先備妥兩者。
驗收:確認已登入 github.com;確認 GitHub Education 申請已送出(畫面顯示「Application submitted」,或已顯示核准後的權益頁面)。
實作與驗收 (Hands-on Activities)
三個部分都設定完成後,用下面的 checklist 做一次總驗收。
| 任務 | 內容 | 驗證重點 |
|---|---|---|
| ChatGPT App 檢查 | 開啟 app,依序切換 Chat、ChatGPT Work、Codex 三種介面;在 Codex 用「先要求核准」跑一次 Hello, AI Agent 任務 | 三種工作介面都能正常開啟並登入;Codex 能建立檔案並回報結果 |
| VS Code 擴充套件檢查 | 請 Codex 依提示語安裝 VS Code 與所有需要的擴充套件;開啟 Extensions 視窗確認套件已啟用;分別開啟 .py / .md / .html / .csv / .json / .docx(或 .xlsx)樣本檔案 | Codex 能列出成功安裝的項目;語法標示與文件預覽都正常顯示,不需另外開啟 Word/Excel |
| GitHub 帳號檢查 | 登入 github.com;查看 GitHub Education 申請狀態 | 帳號可正常登入;Education 申請已送出或已核准 |
| Google Antigravity 檢查(替代方案,可選) | 在需人工確認的設定下,請 Agent 建立 hello.txt | 能登入;每個動作可先檢視再同意;Agent 能建立檔案並回報結果 |
| GitHub Copilot Pro 檢查(替代方案,可選) | 教育資格核准後,確認 Copilot 設定資格並在 VS Code 登入 | Copilot 可在 VS Code 正常完成一次對話或程式碼協作 |
AI Agent Hands-on Environment Setup
This module prepares three things you need to work with an AI agent on a Windows 11 laptop: install and configure the ChatGPT desktop app (Chat, ChatGPT Work, and Codex); install VS Code with the matching extensions; and register a personal GitHub account and submit a GitHub Education application. The three parts are independent — work through them at your own pace, then check off all three at the end.
Learning Objectives
After this module, participants can:
- Install and sign in to the ChatGPT desktop app, and choose Chat, ChatGPT Work, or Codex for the task at hand.
- Have Codex install VS Code, plus the Codex, GitHub Copilot, and Claude Code extensions, with one prompt, so the AI agent can read, write, and review code directly in the editor.
- Have Codex install syntax highlighting for Python, JavaScript, and HTML in VS Code, viewing and simple editing for Markdown, CSV, and JSON, plus direct previews for MS Office files (docx/xlsx/pptx), without installing each one by hand or switching to another app to view course material.
- Register a personal GitHub account and submit a GitHub Education (teacher / Global Campus) verification application.
- Use the checklist to verify all three parts are set up and troubleshoot common issues.
Prerequisites
| Item | Description |
|---|---|
| Personal laptop | Windows 11, with administrator (software installation) permissions |
| Network | Internet access to download installers, register accounts, and reach AI services |
| ChatGPT account | A ChatGPT account with Codex access; if you don't have one, create it on the website or the first time you launch the desktop app |
| Email address | A school-domain email is recommended — used to register a GitHub account and apply for GitHub Education, and it speeds up faculty verification |
| Basic skills | Comfortable opening a browser; able to review and approve each install command Codex proposes |
Minimum Computer Requirements
This module only needs VS Code, the ChatGPT desktop app, and a browser open at the same time, so the requirements are lighter than a full developer toolchain. The "Recommended" column marks the threshold for a smoother experience.
| Item | Minimum | Recommended |
|---|---|---|
| Operating system | Windows 11 (64-bit) | Windows 11, fully updated |
| Processor | 64-bit x64 dual-core | Quad-core or better |
| Memory (RAM) | 8 GB | 16 GB |
| Free disk space | 5 GB | 10 GB or more |
| Permissions | Administrator permissions (can install software, allow UAC prompts) | Same as minimum |
| Network | Stable broadband with access to GitHub and AI services | Same as minimum |
| Browser | Microsoft Edge or Chrome | Same as minimum |
8 GB of RAM is enough to complete every task in this module, but 16 GB is noticeably smoother once VS Code, a browser, and the ChatGPT desktop app are all open together.
Overview of the Three Parts
The three things this module covers are independent of each other — work through them in whatever order suits you:
| Part | Covers |
|---|---|
| Part 1: ChatGPT App | Install the ChatGPT desktop app; after signing in, get comfortable switching between Chat, ChatGPT Work, and Codex |
| Part 2: VS Code + Extensions | Have Codex install VS Code, add the Codex, GitHub Copilot, and Claude Code AI-agent extensions, plus Python/Markdown/HTML syntax highlighting, CSV/JSON viewing and editing, and an MS Office document preview extension |
| Part 3: GitHub Account + GitHub Education | Register a personal GitHub account and submit a GitHub Education (teacher) verification application to unlock education-tier benefits for later modules |
Part 1: Install and Configure the ChatGPT App (Chat / Work / Codex)
The ChatGPT desktop app is the shared entry point on Windows for Chat, ChatGPT Work, and Codex.
| Tool | Official Download / Notes | Recommended Command or Steps |
|---|---|---|
| ChatGPT desktop app | OpenAI: ChatGPT desktop app for Windows | Follow the official link and click Install on the Microsoft Store page. Then open the app and sign in with your ChatGPT account. |
This is the only piece of software in this module you install by hand: there's no AI agent yet to do it for you. Once it's installed and signed in, every install starting with Part 2 is handled by Codex instead.
After signing in, pick the right interface for the task:
- Use Chat for quick questions.
- Select ChatGPT, then Work, for research, documents, or a multi-step, reviewable outcome.
- Select Codex from the product menu for a course project, code, commands, and diffs.
⚠️ Before sending the first task in Codex, choose Ask for approval; don't enable Full access by default. That way you can review what the agent intends to do and what it changed at every step, before deciding whether to approve it.
Check: run the guided "Hello, AI Agent" task (ask Codex to create a hello.txt file in the project folder) to confirm the AI agent can receive instructions, produce a file, and report back.
Part 2: VS Code and Extensions
VS Code is the main window for working with the AI agent later. You don't need to install any of this by hand — hand it to the Codex you set up in Part 1 instead: open a new Codex session, paste the prompt below, and review and approve each command it proposes.
Please install a free program called Visual Studio Code.

Once that's installed, please also add some helpful features so I can:
1. Use AI agent tools like Codex, GitHub Copilot, and Claude Code
2. View, and also do simple editing of, HTML, Markdown, CSV, and JSON files, plus Word, Excel, and PowerPoint documents
3. Have common programming languages (like Python, JavaScript, HTML) automatically color-highlight keywords and other important text when I'm reading them

Before starting each step, tell me in plain terms what you're about to do and wait for me to say "okay" or "go ahead" before continuing. When everything is finished, give me a clear list of what succeeded and what didn't.
What's described above is actually delivered by installing the following:
| Purpose | Extension | Marketplace ID |
|---|---|---|
| Codex coding agent | Codex (OpenAI's coding-agent extension; shares sign-in with the desktop app) | openai.chatgpt |
| GitHub Copilot | Code completion and Copilot Chat | GitHub.copilot |
| Claude Code | Anthropic's coding-agent extension | anthropic.claude-code |
| Python syntax highlighting | Python (official Microsoft extension) | ms-python.python |
| JavaScript / TypeScript syntax highlighting | Built into VS Code, no extra install needed | — |
| HTML syntax highlighting | Built into VS Code, no extra install needed | — |
| Markdown syntax highlighting and preview | Markdown All in One | yzhang.markdown-all-in-one |
| HTML live preview | Live Preview (official Microsoft extension) | ms-vscode.live-server |
| CSV viewing and simple editing | Rainbow CSV | mechatroner.rainbow-csv |
| JSON viewing and simple editing | Built into VS Code, no extra install needed | — |
| MS Office document preview (docx/xlsx/pptx) | Office Viewer | cweijan.vscode-office |
⚠️ Extension IDs change as the Marketplace is updated. If Codex reports that an ID failed or wasn't found, have it search the Marketplace for the current name and ID before retrying — especially Claude Code, CSV, and the Office document preview extension, which are newer or less mainstream picks.
Check: open the Extensions panel and confirm the extensions above are installed and enabled; then open a sample .py, .md, .html, .csv, .json, and a .docx or .xlsx file, and confirm syntax highlighting or the preview renders correctly.
Alternatives: More AI Agent Options
This workshop uses the ChatGPT app/Codex as its primary path, but two alternatives may suit different needs: Google Antigravity, and GitHub Copilot Pro for people who qualify through GitHub Education. Features, plans, and availability can change, so check the current official information before installing or enabling either option.
Google Antigravity
Google Antigravity and Antigravity IDE are agent-first products for developers, with official Windows downloads available. If you try this path, still begin with a small task: create a test file, inspect the intended actions and changes, and only then allow execution.
| Tool | Official Download / Notes | Recommended Steps |
|---|---|---|
| Google Antigravity | Google: Antigravity download page | Download the Windows installer, complete setup, and sign in. For first use, choose settings that require human review of execution and changes. |
⚠️ Terminal and file-change review settings differ between agent tools. At first, inspect every command and change before approving it, then loosen permissions gradually.
Check: with a setting that requires human review, ask the agent to create hello.txt. Confirm that it receives the request, proposes actions, creates the file, and reports the result.
GitHub Copilot (through GitHub Education)
After a teacher is verified through GitHub Education, they may qualify for free GitHub Copilot Pro under GitHub's current eligibility rules. Eligibility and plans are re-evaluated, so after approval, check the Copilot settings page and finish activation there.
| Tool | Official Download / Notes | Recommended Steps |
|---|---|---|
| GitHub Copilot Pro (teacher eligibility) | GitHub Education teacher application | Complete Part 3 teacher verification. If eligible, confirm and enable access in Copilot settings, then sign in with the same GitHub account in VS Code. |
Check: after the education eligibility is approved, confirm the available entitlement in GitHub Copilot settings, then complete one Copilot Chat prompt or code change in VS Code.
Part 3: Apply for a GitHub Account and GitHub Education
A GitHub account is the foundation for managing projects and files in later modules; GitHub Education lets a verified teacher unlock education-tier benefits for tools like Copilot.
| Step | Description |
|---|---|
| Register a GitHub account | Go to github.com/signup and complete registration. For teacher benefits, use a verifiable school-issued email address. |
| Apply for GitHub Education (teacher) | Follow the GitHub Education teacher application: start an application in Education benefits settings and provide a verifiable school email plus proof of school affiliation. |
| Wait for review | Wait for GitHub's decision. You can continue using the GitHub account while waiting; education benefits activate after approval. |
GitHub's current teacher application requires a verifiable school-issued email address and proof of school affiliation. Prepare both before applying.
Check: confirm you're signed in at github.com; confirm the GitHub Education application has been submitted (the page shows "Application submitted", or already shows the approved benefits page).
Hands-on Activities
Once all three parts are set up, run through the checklist below for a final check.
| Task | Description | What It Verifies |
|---|---|---|
| ChatGPT App check | Open the app and switch between Chat, ChatGPT Work, and Codex in turn; in Codex, run the Hello, AI Agent task once with Ask for approval selected | All three interfaces open and sign in correctly; Codex can create a file and report back |
| VS Code extensions check | Have Codex install VS Code and all the needed extensions using the prompt; open the Extensions panel to confirm the extensions are enabled; open sample .py / .md / .html / .csv / .json / .docx (or .xlsx) files in turn | Codex lists what installed successfully; syntax highlighting and document previews render correctly without opening Word/Excel |
| GitHub account check | Sign in at github.com; check the GitHub Education application status | The account signs in normally; the Education application is submitted or approved |
| Google Antigravity check (optional alternative) | With human review enabled, ask the agent to create hello.txt | You can sign in; each action can be reviewed before approval; the agent creates the file and reports the result |
| GitHub Copilot Pro check (optional alternative) | After education eligibility is approved, confirm Copilot settings and sign in from VS Code | Copilot can complete one conversation or code-collaboration task in VS Code |