AI Agent 實作環境建置
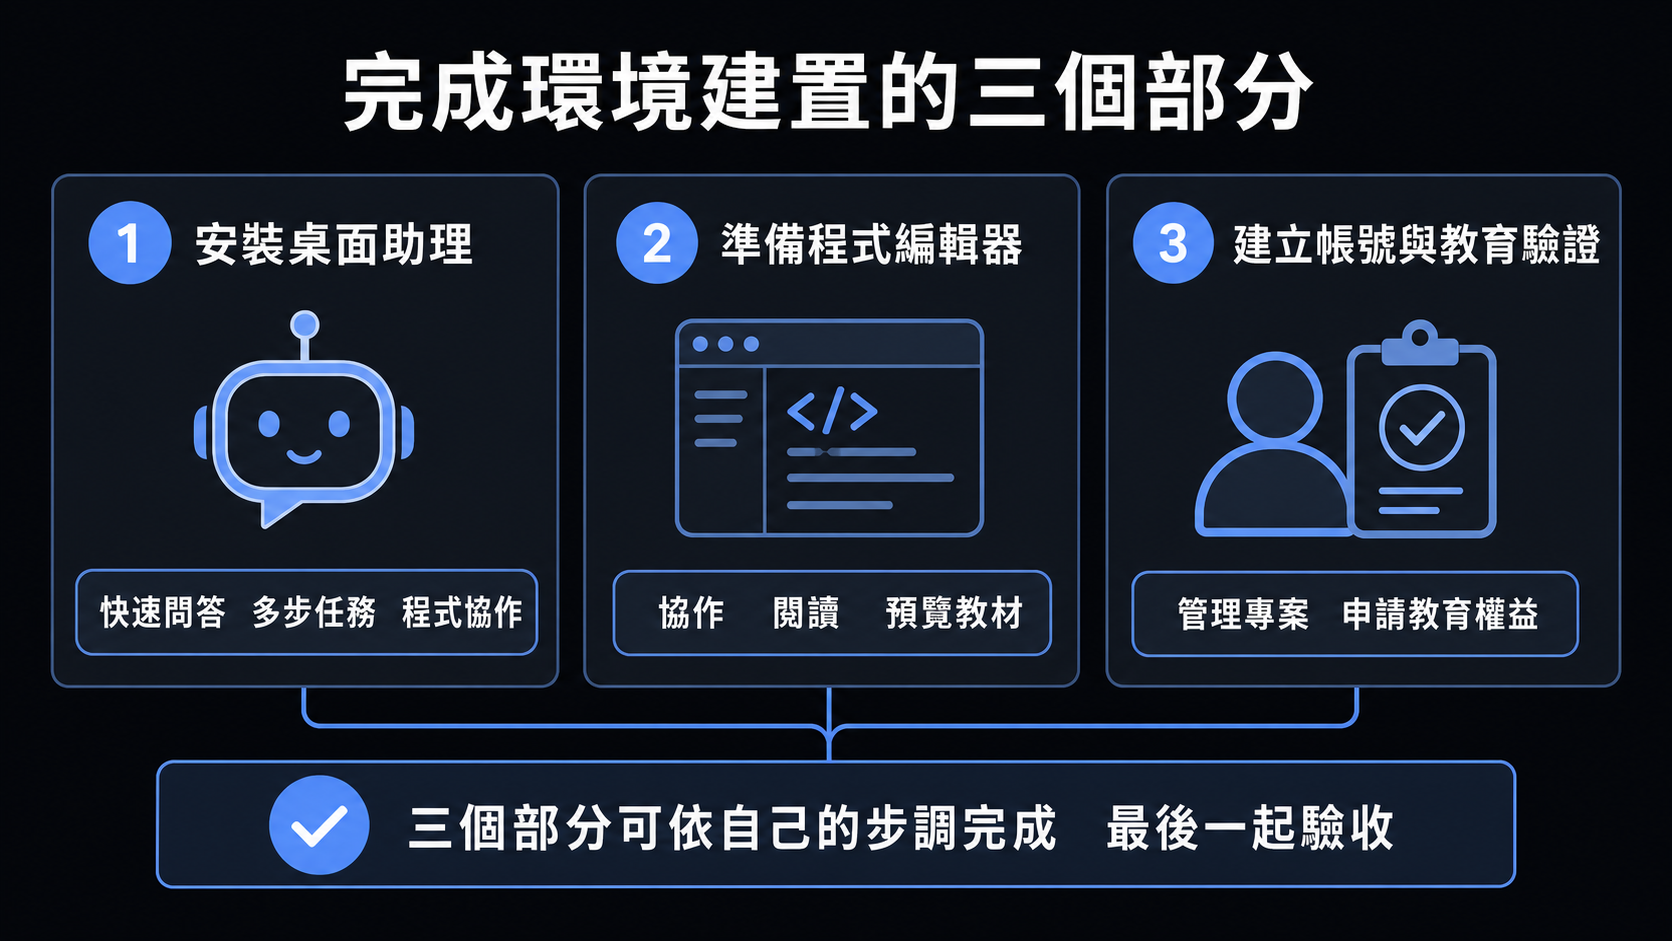
本模組聚焦在 Windows 11 筆電上,把「跟 AI Agent 協作」所需的三個部分準備好:先安裝並設定 ChatGPT 桌面 app(Chat、ChatGPT Work、Codex 三種工作介面);再把 VS Code 裝好對應的擴充套件;最後申請個人 GitHub 帳號並送出 GitHub Education 驗證。三個部分彼此獨立,可以照自己的步調完成,最後再一起驗收。
學習目標 (Learning Objectives)
完成本模組後,學員應能:
- 安裝並登入 ChatGPT 桌面 app,依任務性質選擇 Chat、ChatGPT Work 或 Codex 三種工作介面。
- 在 VS Code 安裝 Codex 與 GitHub Copilot 兩個 AI Agent 擴充套件,讓 AI 能直接在編輯器裡協助讀寫、審查程式碼。
- 在 VS Code 安裝並使用 Python、JavaScript、Markdown、HTML 的語法標示,以及 MS Office 文件(docx/xlsx/pptx)的直接預覽,不用切換到其他應用程式就能檢視教材。
- 申請個人 GitHub 帳號,並送出 GitHub Education(教師/Global Campus)驗證申請。
- 依 checklist 自行驗證三個部分是否設定完成,並排除常見問題。
先備條件 (Prerequisites)
| 項目 | 說明 |
|---|---|
| 個人筆電 | Windows 11,具系統管理員(安裝軟體)權限 |
| 網路 | 可連線下載安裝套件、註冊帳號與存取 AI 服務 |
| ChatGPT 帳號 | 可使用 Codex 的 ChatGPT 帳號;若還沒有,可在官網或桌面 app 首次啟動時建立 |
| Email 信箱 | 建議使用學校網域信箱,註冊 GitHub 帳號與申請 GitHub Education 時會用到,有助於加快教師身分驗證 |
| 基本操作 | 能開啟並操作瀏覽器,下載並執行安裝檔 |
最低電腦需求 (Minimum Computer Requirements)
本模組只需同時開啟 VS Code、ChatGPT 桌面 app 與瀏覽器,需求比完整開發工具鏈輕。標示「建議」者為較順暢的體驗門檻。
| 項目 | 最低需求 | 建議 |
|---|---|---|
| 作業系統 | Windows 11 (64 位元) | Windows 11 且更新至最新版 |
| 處理器 | 64 位元 x64 雙核心 | 四核心以上 |
| 記憶體 (RAM) | 8 GB | 16 GB |
| 可用磁碟空間 | 5 GB | 10 GB 以上 |
| 權限 | 具系統管理員權限 (可安裝軟體、允許 UAC) | 同左 |
| 網路 | 穩定寬頻,可存取 GitHub 與 AI 服務 | 同左 |
| 瀏覽器 | Microsoft Edge 或 Chrome | 同左 |
8 GB 記憶體可完成本模組所有任務,但 VS Code、瀏覽器與 ChatGPT 桌面 app 一起開啟時,16 GB 會比較順暢。
三個部分總覽 (Overview of the Three Parts)
本模組要完成的三件事彼此獨立,可以照自己的步調依序完成:
| 部分 | 涵蓋內容 |
|---|---|
| 第一部分:ChatGPT App | 安裝 ChatGPT 桌面 app,登入後熟悉 Chat、ChatGPT Work、Codex 三種工作介面的差異與切換時機 |
| 第二部分:VS Code + 擴充套件 | 安裝 VS Code,加裝 Codex 與 GitHub Copilot 兩個 AI Agent 擴充套件,以及 Python/Markdown/HTML 語法標示與 MS Office 文件預覽套件 |
| 第三部分:GitHub 帳號 + GitHub Education | 註冊個人 GitHub 帳號,送出 GitHub Education(教師)驗證申請,取得後續課程與工具的教育版權益 |
第一部分:安裝與設定 ChatGPT App (Chat / Work / Codex)
ChatGPT 桌面 app 是 Windows 上進入 Chat、ChatGPT Work 與 Codex 三種工作介面的共同入口。
| 工具 | 官方下載/說明 | 建議指令或操作 |
|---|---|---|
| ChatGPT 桌面 app | OpenAI:ChatGPT desktop app for Windows | winget install --id 9PLM9XGG6VKS --source msstore,或從 Microsoft Store 安裝。安裝後開啟 app,使用 ChatGPT 帳號登入。 |
登入後,依任務性質選擇正確的工作介面:
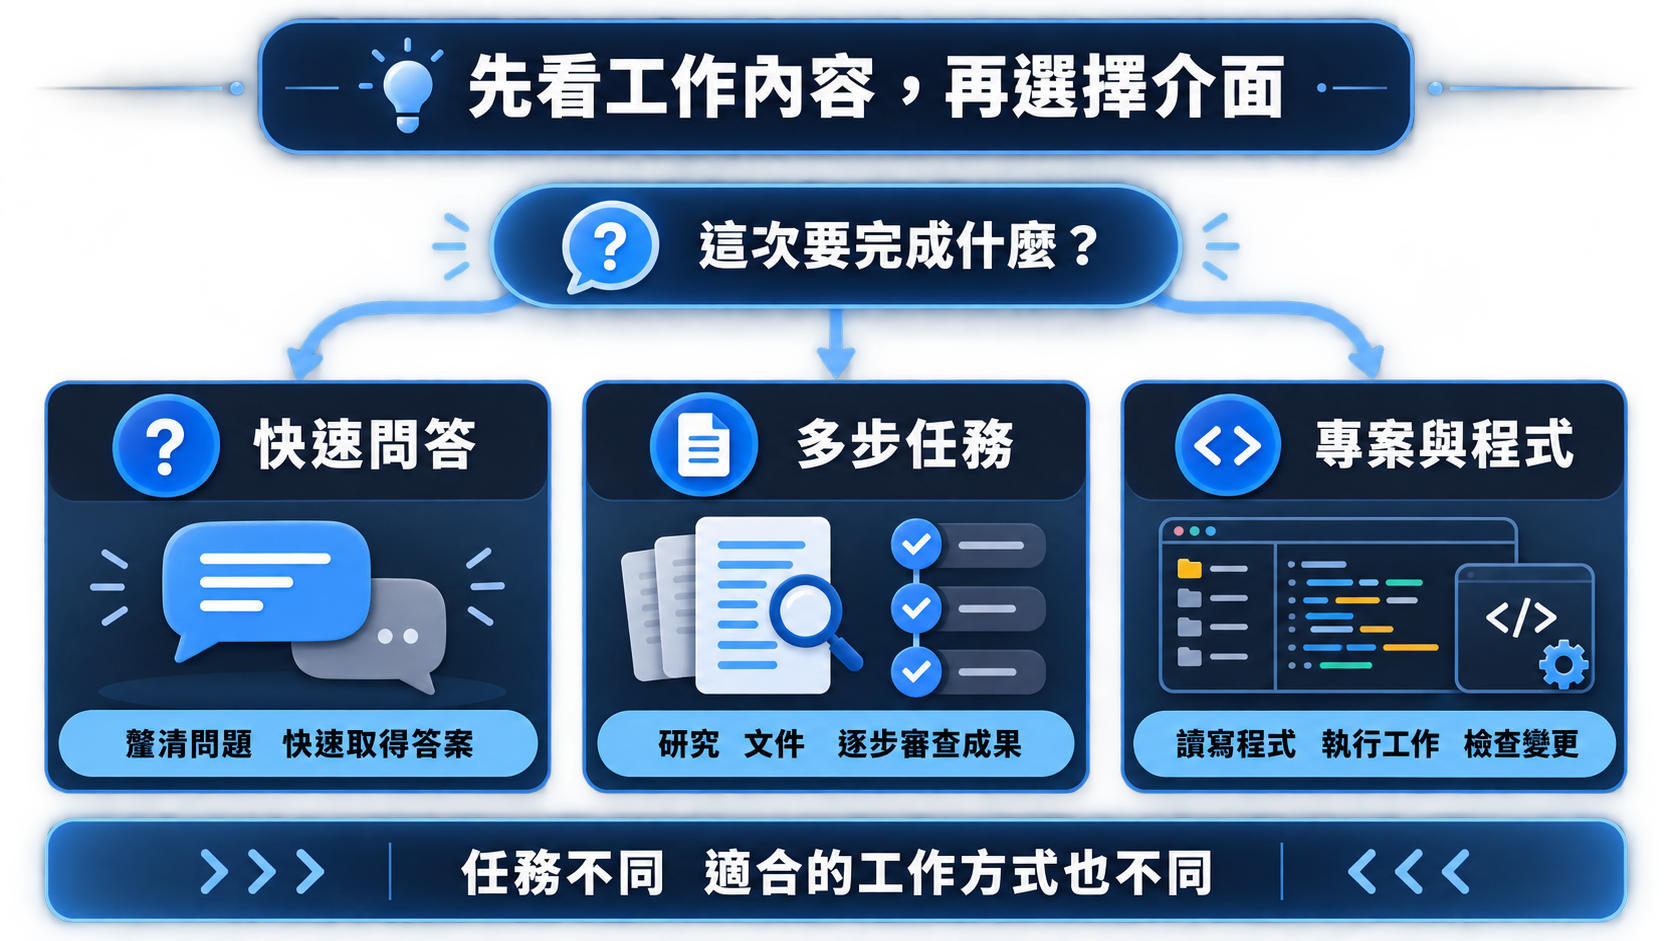
- 需要快速問答時選 Chat。
- 要完成研究、文件或需要審查的多步驟成果時,先選 ChatGPT,再切換到 Work。
- 要處理課程 project、程式碼、指令與 diff 時,從產品選單選 Codex。
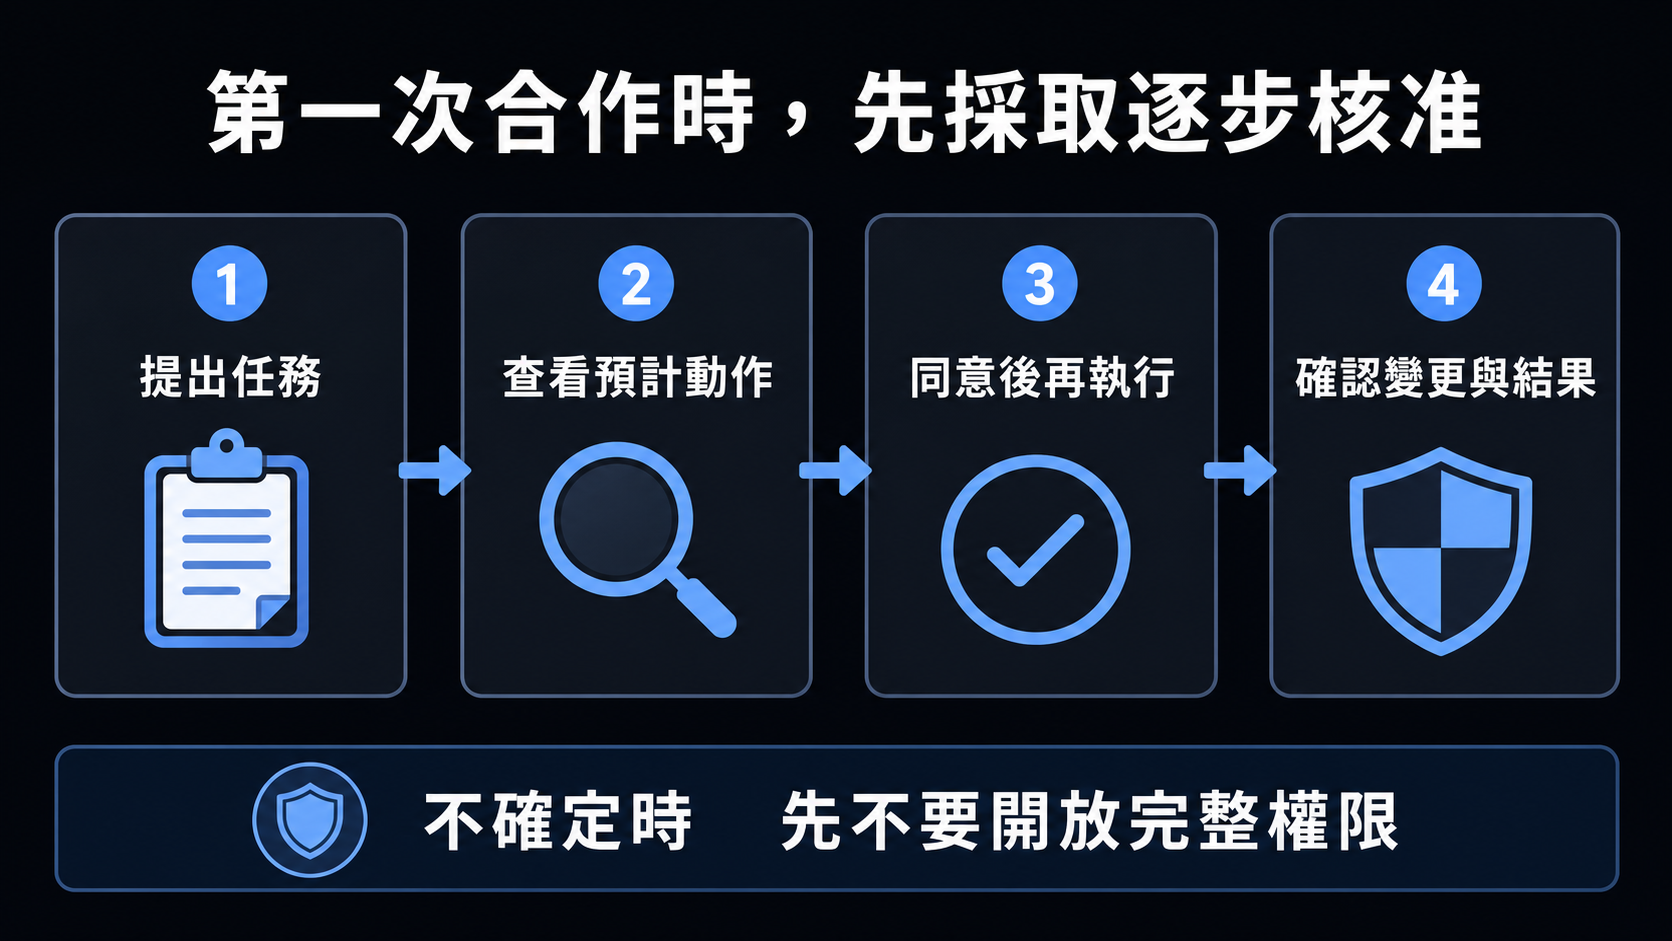
⚠️ 在 Codex 送出第一個任務前,先選先要求核准(Ask for approval),不要一開始就打開完整存取權(Full access),這樣才能在每一步都看清楚 Agent 打算做什麼、產生了哪些變更,再決定要不要放行。
驗收:執行 guided「Hello, AI Agent」任務(請 Codex 在專案資料夾建立一個 hello.txt),確認 AI Agent 能接收指令、產生檔案並回報結果。
第二部分:VS Code 與擴充套件
VS Code 是之後操作 AI Agent 的主要工作視窗,搭配下列擴充套件,就能在同一個視窗裡完成程式協作與教材檢視。
| 工具 | 官方下載/說明 | 建議指令或操作 |
|---|---|---|
| VS Code | https://code.visualstudio.com/download | winget install --id Microsoft.VisualStudioCode --source winget --exact |
| 用途 | 擴充套件 | Marketplace ID |
|---|---|---|
| Codex 編程代理 | Codex(OpenAI 的程式協作擴充套件,與桌面 app 共用登入) | openai.chatgpt |
| GitHub Copilot | 程式碼自動完成與 Copilot Chat | GitHub.copilot |
| Python 語法標示 | Python(Microsoft 官方擴充套件) | ms-python.python |
| JavaScript/TypeScript 語法標示 | VS Code 內建,不需另外安裝 | — |
| Markdown 語法標示與預覽 | Markdown All in One | yzhang.markdown-all-in-one |
| HTML 即時預覽 | Live Preview(Microsoft 官方擴充套件) | ms-vscode.live-server |
| MS Office 文件預覽(docx/xlsx/pptx) | Office Viewer | cweijan.vscode-office |
可在 VS Code 左側 Extensions 視窗搜尋安裝,也可在終端機逐行執行:
code --install-extension openai.chatgpt
code --install-extension GitHub.copilot
code --install-extension ms-python.python
code --install-extension yzhang.markdown-all-in-one
code --install-extension ms-vscode.live-server
code --install-extension cweijan.vscode-office
⚠️ 擴充套件 ID 會隨 Marketplace 更新而變動,正式開課前請先在 Extensions 視窗搜尋名稱確認 ID 仍然正確,尤其是 Office 文件預覽這款較小眾的套件。
驗收:開啟 Extensions 視窗確認上述套件都已安裝並啟用;再分別開啟一個 .py、.md、.html,以及一份 .docx 或 .xlsx 檔案,確認語法標示或預覽畫面正常顯示。
替代方案:更多免費 AI Agent 選擇
除了第一部分的 ChatGPT App/Codex,這裡再列出兩種同樣免費、額度通常足以應付工作坊規模任務的 AI Agent 選擇,提供給想要更多彈性的學員:Google Antigravity,以及透過第三部分 GitHub Education 解鎖的 GitHub Copilot 教育版。
Google Antigravity
Google Antigravity 跟 ChatGPT App/Codex 一樣,能接收指令、讀寫程式碼、執行任務,核心模型為 Gemini 3.1 Pro/Flash。特別列出它的原因,是目前為公開預覽階段,個人 Google(Gmail)帳號的免費使用額度相當寬鬆,不需要信用卡。它同時內建一套類似 VS Code 的編輯器,所以選擇這個替代方案時,也可以略過第一、二部分(分別安裝 ChatGPT 桌面 app 與 VS Code),安裝完成後直接進行第三部分(申請 GitHub 帳號)。
| 工具 | 官方下載/說明 | 建議指令或操作 |
|---|---|---|
| Google Antigravity | Google:Antigravity 下載頁面 | 至下載頁面取得 Windows 安裝檔並執行安裝;或在 PowerShell 執行 irm https://antigravity.google/cli/install.ps1 | iex 安裝 CLI。安裝後開啟 Antigravity,使用個人 Google 帳號登入。 |
⚠️ Antigravity 對「終端機執行指令」與「Agent 變更內容」都有可調整的審核層級(Terminal Execution Policy 的 Off/Auto/Turbo,以及 Artifact 的 Review 政策)。第一次使用建議選擇需要人工確認的設定,確認 Agent 打算執行的指令與變更內容後再放行,熟悉後再依信任程度放寬。
驗收:開啟 Antigravity,確認能以個人 Google 帳號成功登入;在需要人工確認的設定下,比照 Hello, AI Agent 任務請 Agent 建立一個 hello.txt,確認 Agent 能接收指令、產生檔案並回報結果。
GitHub Copilot(透過 GitHub Education)
第二部分已經安裝的 GitHub Copilot 擴充套件,預設是付費方案;只要在第三部分成功通過 GitHub Education 教師身分驗證,Copilot 就會自動轉為教育版方案,額度更寬鬆且免費,不需要另外安裝或設定新的擴充套件。
| 工具 | 官方下載/說明 | 建議指令或操作 |
|---|---|---|
| GitHub Copilot(教育版) | github.com/education/teachers(同第三部分的申請頁面) | 先完成第三部分的 GitHub Education 教師驗證;核准後在 VS Code 用已安裝的 GitHub Copilot 擴充套件登入通過驗證的 GitHub 帳號,方案會自動套用為教育版。 |
驗收:GitHub Education 核准後,在 VS Code 的 Copilot 圖示或帳號狀態確認方案已顯示為教育版/免費;能正常使用 Copilot Chat 詢問或修改程式碼。
第三部分:申請 GitHub 帳號與 GitHub Education
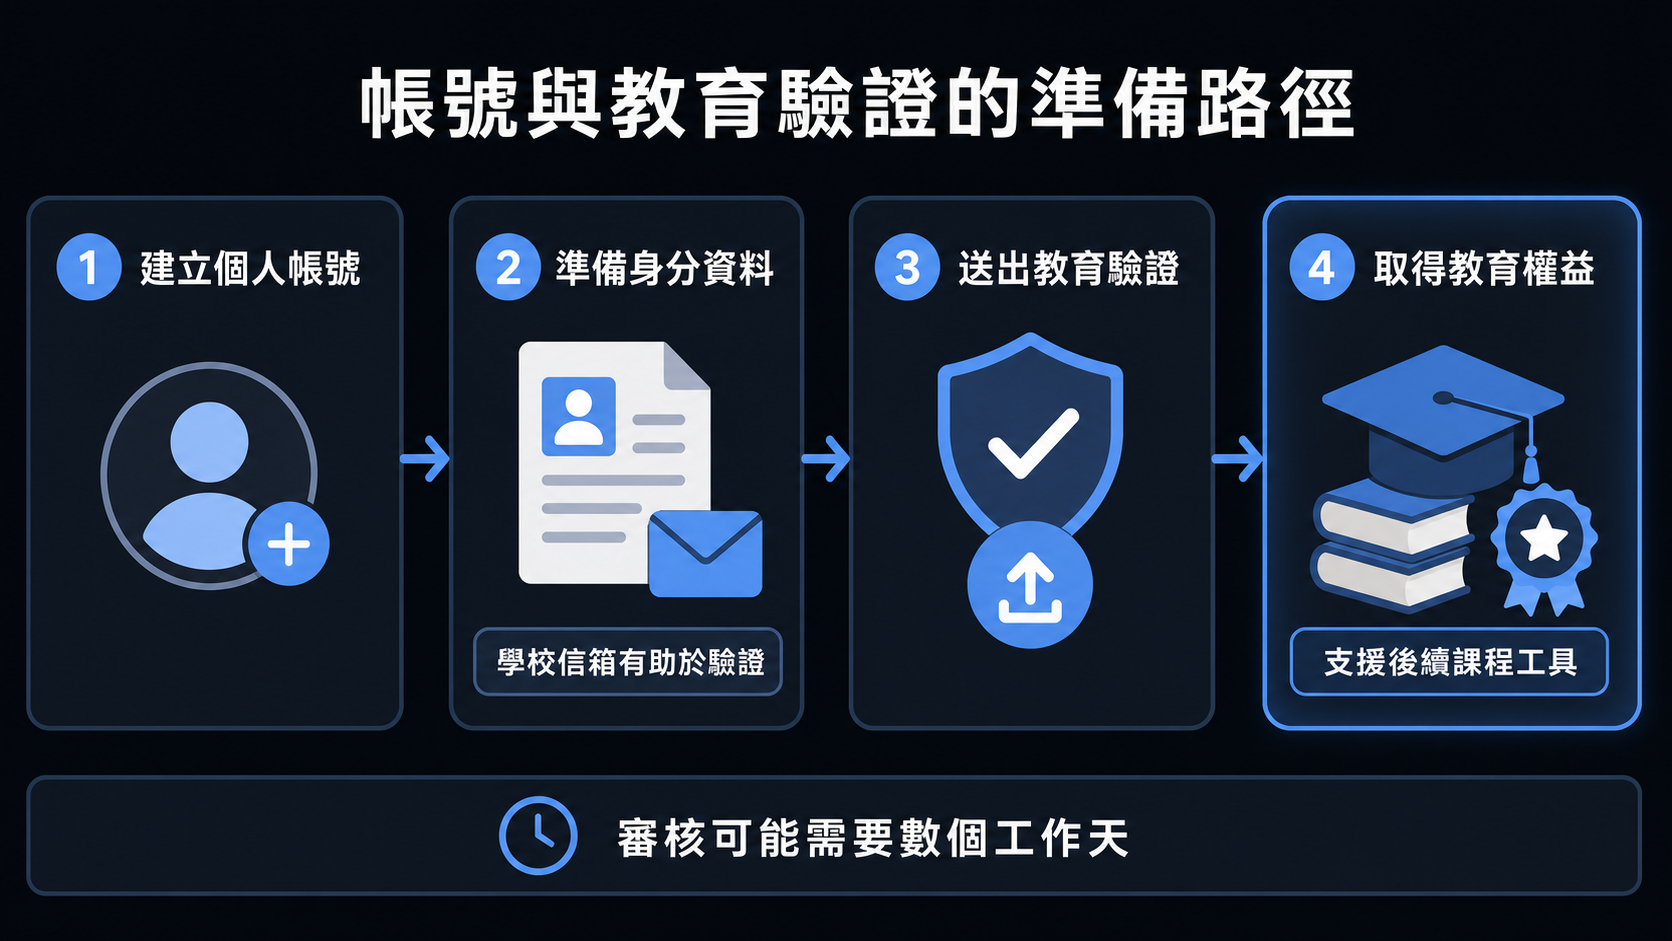
GitHub 帳號是後續課程管理專案、儲存檔案的基礎;GitHub Education 則能讓教師身分取得 Copilot 等工具的教育版權益。
| 步驟 | 說明 |
|---|---|
| 註冊 GitHub 帳號 | 前往 github.com/signup 完成註冊;建議使用學校網域信箱,方便之後的教師身分驗證與通知 |
| 申請 GitHub Education(教師) | 登入後前往 github.com/education/teachers,依指示提供任教證明(學校信箱驗證、教職證明文件或課程頁面連結) |
| 等待審核 | 審核通常需要數個工作天;審核期間仍可正常使用 GitHub 帳號本身的功能,教育版權益要核准後才會生效 |
學校信箱不是必要條件,但用學校網域信箱註冊,通常能加快 GitHub Education 的自動驗證流程。
驗收:確認已登入 github.com;確認 GitHub Education 申請已送出(畫面顯示「Application submitted」,或已顯示核准後的權益頁面)。
實作與驗收 (Hands-on Activities)
三個部分都設定完成後,用下面的 checklist 做一次總驗收。
| 任務 | 內容 | 驗證重點 |
|---|---|---|
| ChatGPT App 檢查 | 開啟 app,依序切換 Chat、ChatGPT Work、Codex 三種介面;在 Codex 用「先要求核准」跑一次 Hello, AI Agent 任務 | 三種工作介面都能正常開啟並登入;Codex 能建立檔案並回報結果 |
| VS Code 擴充套件檢查 | 開啟 Extensions 視窗確認套件已啟用;分別開啟 .py / .md / .html / .docx(或 .xlsx)樣本檔案 | 語法標示與文件預覽都正常顯示,不需另外開啟 Word/Excel |
| GitHub 帳號檢查 | 登入 github.com;查看 GitHub Education 申請狀態 | 帳號可正常登入;Education 申請已送出或已核准 |
| Google Antigravity 檢查(替代方案,可選) | 開啟 Antigravity,以個人 Google 帳號登入;在需要人工確認的設定下跑一次 Hello, AI Agent 任務 | 能以個人 Google 帳號登入;Agent 能建立檔案並回報結果 |
| GitHub Copilot 教育版檢查(替代方案,可選) | GitHub Education 核准後,在 VS Code 用已安裝的 Copilot 擴充套件登入該帳號 | Copilot 方案顯示為教育版/免費;Copilot Chat 能正常使用 |
AI Agent Hands-on Environment Setup
This module prepares three things you need to work with an AI agent on a Windows 11 laptop: install and configure the ChatGPT desktop app (Chat, ChatGPT Work, and Codex); install VS Code with the matching extensions; and register a personal GitHub account and submit a GitHub Education application. The three parts are independent — work through them at your own pace, then check off all three at the end.
Learning Objectives
After this module, participants can:
- Install and sign in to the ChatGPT desktop app, and choose Chat, ChatGPT Work, or Codex for the task at hand.
- Install the Codex and GitHub Copilot extensions in VS Code so the AI agent can read, write, and review code directly in the editor.
- Install and use syntax highlighting for Python, JavaScript, Markdown, and HTML in VS Code, plus direct previews for MS Office files (docx/xlsx/pptx), without switching to another app to view course material.
- Register a personal GitHub account and submit a GitHub Education (teacher / Global Campus) verification application.
- Use the checklist to verify all three parts are set up and troubleshoot common issues.
Prerequisites
| Item | Description |
|---|---|
| Personal laptop | Windows 11, with administrator (software installation) permissions |
| Network | Internet access to download installers, register accounts, and reach AI services |
| ChatGPT account | A ChatGPT account with Codex access; if you don't have one, create it on the website or the first time you launch the desktop app |
| Email address | A school-domain email is recommended — used to register a GitHub account and apply for GitHub Education, and it speeds up faculty verification |
| Basic skills | Comfortable opening a browser, and downloading and running an installer |
Minimum Computer Requirements
This module only needs VS Code, the ChatGPT desktop app, and a browser open at the same time, so the requirements are lighter than a full developer toolchain. The "Recommended" column marks the threshold for a smoother experience.
| Item | Minimum | Recommended |
|---|---|---|
| Operating system | Windows 11 (64-bit) | Windows 11, fully updated |
| Processor | 64-bit x64 dual-core | Quad-core or better |
| Memory (RAM) | 8 GB | 16 GB |
| Free disk space | 5 GB | 10 GB or more |
| Permissions | Administrator permissions (can install software, allow UAC prompts) | Same as minimum |
| Network | Stable broadband with access to GitHub and AI services | Same as minimum |
| Browser | Microsoft Edge or Chrome | Same as minimum |
8 GB of RAM is enough to complete every task in this module, but 16 GB is noticeably smoother once VS Code, a browser, and the ChatGPT desktop app are all open together.
Overview of the Three Parts
The three things this module covers are independent of each other — work through them in whatever order suits you:
| Part | Covers |
|---|---|
| Part 1: ChatGPT App | Install the ChatGPT desktop app; after signing in, get comfortable switching between Chat, ChatGPT Work, and Codex |
| Part 2: VS Code + Extensions | Install VS Code, add the Codex and GitHub Copilot AI-agent extensions, plus Python/Markdown/HTML syntax highlighting and an MS Office document preview extension |
| Part 3: GitHub Account + GitHub Education | Register a personal GitHub account and submit a GitHub Education (teacher) verification application to unlock education-tier benefits for later modules |
Part 1: Install and Configure the ChatGPT App (Chat / Work / Codex)
The ChatGPT desktop app is the shared entry point on Windows for Chat, ChatGPT Work, and Codex.
| Tool | Official Download / Notes | Recommended Command or Steps |
|---|---|---|
| ChatGPT desktop app | OpenAI: ChatGPT desktop app for Windows | Run winget install --id 9PLM9XGG6VKS --source msstore, or install it from the Microsoft Store. Then open the app and sign in with your ChatGPT account. |
After signing in, pick the right interface for the task:
- Use Chat for quick questions.
- Select ChatGPT, then Work, for research, documents, or a multi-step, reviewable outcome.
- Select Codex from the product menu for a course project, code, commands, and diffs.
⚠️ Before sending the first task in Codex, choose Ask for approval; don't enable Full access by default. That way you can review what the agent intends to do and what it changed at every step, before deciding whether to approve it.
Check: run the guided "Hello, AI Agent" task (ask Codex to create a hello.txt file in the project folder) to confirm the AI agent can receive instructions, produce a file, and report back.
Part 2: VS Code and Extensions
VS Code is the main window for working with the AI agent later. With the extensions below, you can handle both code collaboration and course-material review in the same window.
| Tool | Official Download / Notes | Recommended Command or Steps |
|---|---|---|
| VS Code | https://code.visualstudio.com/download | winget install --id Microsoft.VisualStudioCode --source winget --exact |
| Purpose | Extension | Marketplace ID |
|---|---|---|
| Codex coding agent | Codex (OpenAI's coding-agent extension; shares sign-in with the desktop app) | openai.chatgpt |
| GitHub Copilot | Code completion and Copilot Chat | GitHub.copilot |
| Python syntax highlighting | Python (official Microsoft extension) | ms-python.python |
| JavaScript / TypeScript syntax highlighting | Built into VS Code, no extra install needed | — |
| Markdown syntax highlighting and preview | Markdown All in One | yzhang.markdown-all-in-one |
| HTML live preview | Live Preview (official Microsoft extension) | ms-vscode.live-server |
| MS Office document preview (docx/xlsx/pptx) | Office Viewer | cweijan.vscode-office |
Install these by searching in the VS Code Extensions panel, or run them one by one in a terminal:
code --install-extension openai.chatgpt
code --install-extension GitHub.copilot
code --install-extension ms-python.python
code --install-extension yzhang.markdown-all-in-one
code --install-extension ms-vscode.live-server
code --install-extension cweijan.vscode-office
⚠️ Extension IDs change as the Marketplace is updated. Before the live session, search each name in the Extensions panel to confirm the ID is still correct — especially the Office document preview extension, which is the least mainstream of the set.
Check: open the Extensions panel and confirm the extensions above are installed and enabled; then open a sample .py, .md, .html, and a .docx or .xlsx file, and confirm syntax highlighting or the preview renders correctly.
Alternatives: More Free AI Agent Options
Beyond the ChatGPT app/Codex from Part 1, here are two more AI agent options worth knowing about — both free, with quotas that are typically more than enough for workshop-scale tasks — for anyone who wants more flexibility: Google Antigravity, and the education-tier GitHub Copilot unlocked via Part 3's GitHub Education.
Google Antigravity
Like the ChatGPT app/Codex, Google Antigravity can take instructions, read and write code, and run tasks, powered by Gemini 3.1 Pro/Flash. It's called out here because, during its current public preview, the free usage quota on a personal Google (Gmail) account is generous, with no credit card required. It also bundles a VS Code-like editor, so choosing this alternative lets you skip Parts 1 and 2 (installing the ChatGPT desktop app and VS Code separately) and go straight to Part 3 (GitHub account) once it's installed.
| Tool | Official Download / Notes | Recommended Command or Steps |
|---|---|---|
| Google Antigravity | Google: Antigravity download page | Download the Windows installer from the download page and run it; or install the CLI via PowerShell with irm https://antigravity.google/cli/install.ps1 | iex. Then open Antigravity and sign in with a personal Google account. |
⚠️ Antigravity has adjustable approval levels for both terminal commands and agent-made changes (a Terminal Execution Policy of Off/Auto/Turbo, plus an Artifact Review policy). The first time you use it, pick a setting that requires manual confirmation so you can review what the agent intends to run or change before approving it — then loosen the settings once you trust its behavior.
Check: open Antigravity and confirm you can sign in with a personal Google account; under a setting that requires manual confirmation, run the equivalent "Hello, AI Agent" task (ask the agent to create a hello.txt file) and confirm the agent can receive instructions, produce a file, and report back.
GitHub Copilot (via GitHub Education)
The GitHub Copilot extension installed in Part 2 defaults to a paid plan; once your GitHub Education faculty verification in Part 3 is approved, Copilot automatically switches to the education tier — a more generous, free plan — with no extra extension to install or configure.
| Tool | Official Download / Notes | Recommended Command or Steps |
|---|---|---|
| GitHub Copilot (education tier) | github.com/education/teachers (same application page as Part 3) | Complete the GitHub Education faculty verification in Part 3 first; once approved, sign in to the already-installed GitHub Copilot extension in VS Code with the verified GitHub account — the plan switches to the education tier automatically. |
Check: once GitHub Education is approved, confirm the Copilot icon/account status in VS Code shows the education/free tier, and that Copilot Chat works normally for asking about or editing code.
Part 3: Apply for a GitHub Account and GitHub Education
A GitHub account is the foundation for managing projects and files in later modules; GitHub Education lets a verified teacher unlock education-tier benefits for tools like Copilot.
| Step | Description |
|---|---|
| Register a GitHub account | Go to github.com/signup and complete registration; a school-domain email is recommended to speed up later faculty verification and notifications |
| Apply for GitHub Education (teacher) | After signing in, go to github.com/education/teachers and follow the prompts to provide proof of teaching (school email verification, a faculty ID document, or a link to your course page) |
| Wait for review | Review usually takes a few business days; you can keep using the GitHub account itself while you wait, but the education-tier benefits only apply once approved |
A school-domain email isn't required, but registering with one usually speeds up GitHub Education's automatic verification.
Check: confirm you're signed in at github.com; confirm the GitHub Education application has been submitted (the page shows "Application submitted", or already shows the approved benefits page).
Hands-on Activities
Once all three parts are set up, run through the checklist below for a final check.
| Task | Description | What It Verifies |
|---|---|---|
| ChatGPT App check | Open the app and switch between Chat, ChatGPT Work, and Codex in turn; in Codex, run the Hello, AI Agent task once with Ask for approval selected | All three interfaces open and sign in correctly; Codex can create a file and report back |
| VS Code extensions check | Open the Extensions panel to confirm the extensions are enabled; open sample .py / .md / .html / .docx (or .xlsx) files in turn | Syntax highlighting and document previews render correctly without opening Word/Excel |
| GitHub account check | Sign in at github.com; check the GitHub Education application status | The account signs in normally; the Education application is submitted or approved |
| Google Antigravity check (alternative, optional) | Open Antigravity and sign in with a personal Google account; run the Hello, AI Agent task once under a setting that requires manual confirmation | Signs in successfully with a personal Google account; the agent can create a file and report back |
| GitHub Copilot education-tier check (alternative, optional) | Once GitHub Education is approved, sign in to the already-installed Copilot extension in VS Code with that account | Copilot shows the education/free tier; Copilot Chat works normally |