Windows 11 Vibe Coding 與 AI Agent 環境建置
本模組聚焦在 Windows 11 筆電上的 Vibe Coding 與 AI Agent 工作環境建置。先安裝 ChatGPT 桌面 app,再用一鍵安裝腳本準備開發工具;最後以 Chat、ChatGPT Work 與 Codex 的正確工作介面完成幾個小型驗證任務。
學習目標 (Learning Objectives)
完成本模組後,教師應能:
- 在自己的 Windows 11 筆電上獨立啟動可運作的 Vibe Coding 與 AI Agent 工作環境。
- 使用 ChatGPT 桌面 app 的 Chat、ChatGPT Work 與 Codex 工作介面,依任務選擇適合的入口。
- 使用 VS Code 作為主要開發介面,搭配 Codex CLI 與 Codex 擴充套件進行程式生成、修改與檢查。
- 使用 uv 與 npm 管理 Python 與 Node.js 的套件及專案環境。
- 透過 GitHub CLI (
gh) 以瀏覽器登入 GitHub,完成專案 clone、推送與 GitHub Pages 部署。 - 依據 checklist 自行驗證環境,並排除常見安裝問題。
先備條件 (Prerequisites)
| 項目 | 說明 |
|---|---|
| 個人筆電 | Windows 11,具系統管理 (安裝軟體) 權限 |
| 網路 | 可連線下載安裝套件與存取 AI 服務 |
| ChatGPT 帳號 | 可使用 Codex 的 ChatGPT 帳號;先登入 ChatGPT 桌面 app。實際可用功能依方案、工作區與推出狀況而異,CLI 與 VS Code 擴充套件可使用同一登入帳號。 |
| GitHub 帳號 | 供 GitHub CLI 登入、clone 專案與部署 GitHub Pages 使用 |
| 基本操作 | 能開啟終端機 (terminal) 並輸入指令 |
最低電腦需求 (Minimum Computer Requirements)
本工作坊會同時開啟 VS Code、Node.js、Python、終端機與瀏覽器登入頁面,建議筆電至少符合下列規格。標示「建議」者為較順暢的體驗門檻。
| 項目 | 最低需求 | 建議 |
|---|---|---|
| 作業系統 | Windows 11 (64 位元),並已安裝 App Installer (winget) | Windows 11 且更新至最新版 |
| 處理器 | 64 位元 x64 雙核心 | 四核心以上 |
| 記憶體 (RAM) | 8 GB | 16 GB |
| 可用磁碟空間 | 10 GB | 20 GB 以上 |
| 權限 | 具系統管理員權限 (可安裝軟體、允許 UAC) | 同左 |
| 網路 | 穩定寬頻,可存取 GitHub 與 AI 服務 | 同左 |
| 瀏覽器 | Microsoft Edge 或 Chrome (供登入流程使用) | 同左 |
8 GB 記憶體可完成所有任務,但同時開啟 VS Code、瀏覽器與多個終端機時,16 GB 會明顯較順暢。磁碟空間需求包含工具鏈、專案的 node_modules 與 Python 套件。
安裝的工具 (Toolchain)
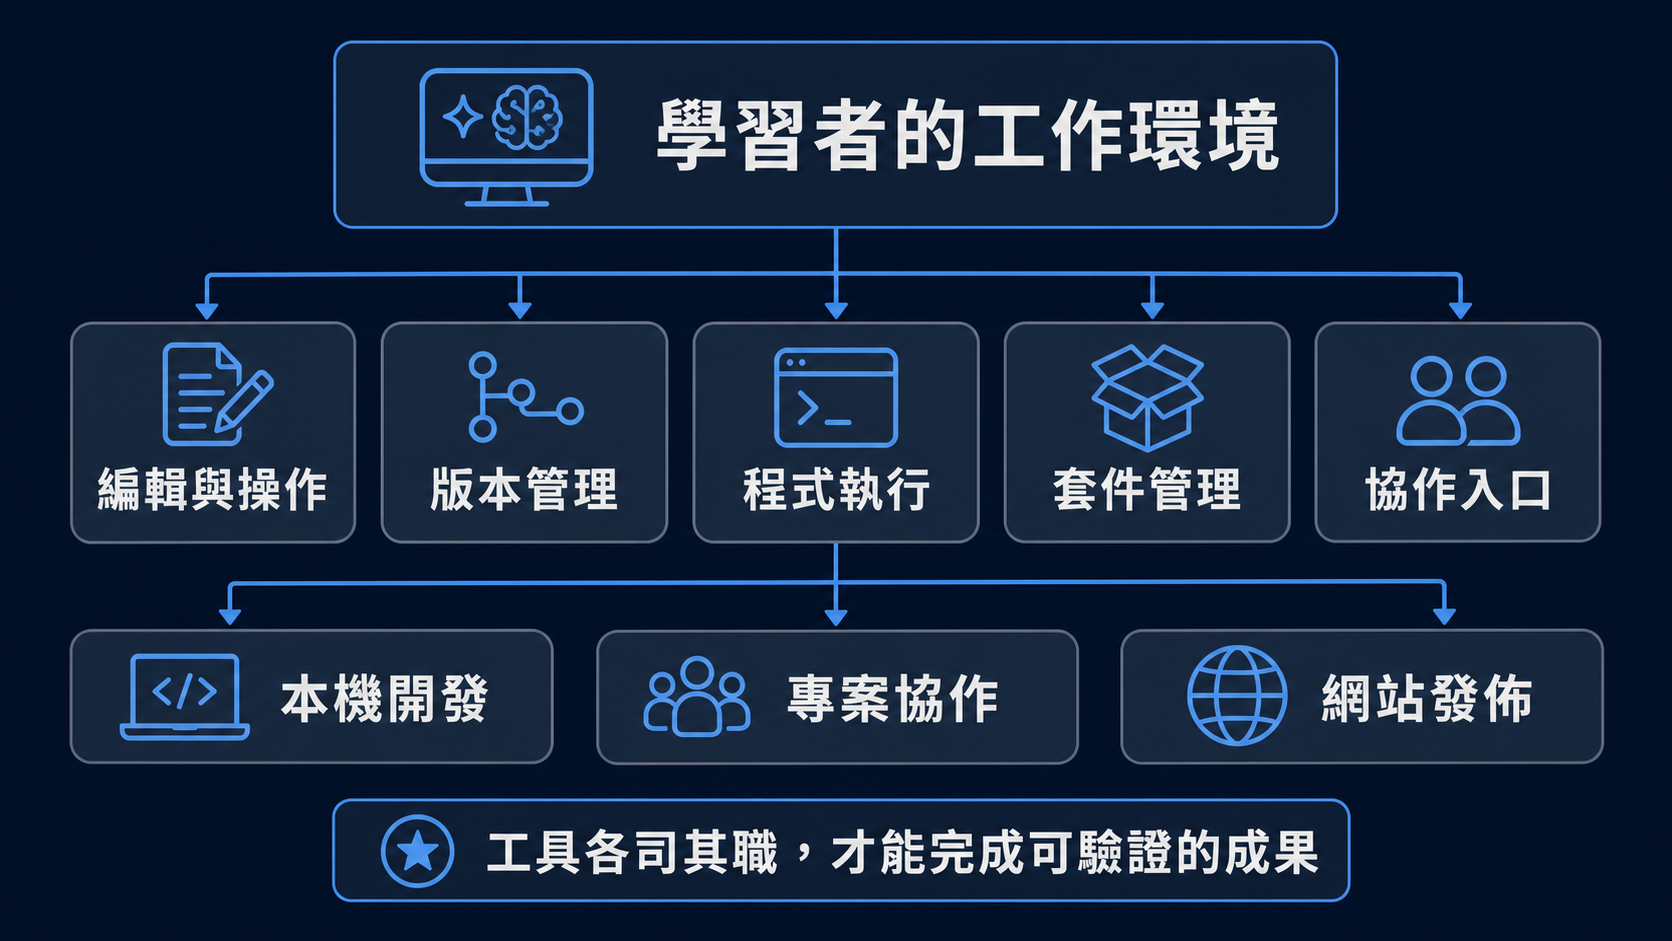
Windows 11 一鍵安裝腳本與課後指南會在筆電上安裝下列工具:
| 工具 | 用途 |
|---|---|
| VS Code | 程式碼編輯器,也是日後操作 AI Agent 的主要視窗 |
| Git | 版本管理工具,許多 AI 工具會用到 |
| Node.js + npm | JavaScript 執行環境,用來啟動 local web server 與安裝 Codex CLI |
| uv (Python) | 管理 Python 與套件,安裝/更新/移除都很簡單 |
| ChatGPT 桌面 app | Windows 上的 Chat、ChatGPT Work 與 Codex 入口;可開啟專案、查看變更與使用整合終端機。 |
| Codex CLI(終端機工作流程) | OpenAI 的 AI Agent 命令列工具;適合需要直接在終端機操作專案的課程練習。先以可使用 Codex 的 ChatGPT 帳號登入,實際功能依帳號與工作區而異。 |
| GitHub CLI (gh) | 用瀏覽器登入 GitHub,clone 專案、推送與部署 GitHub Pages |
| VS Code 擴充套件 | Python、Jupyter、GitLens、ESLint,以及 Codex 編程代理 (openai.chatgpt) |
安裝方式一:手動下載與安裝必要工具
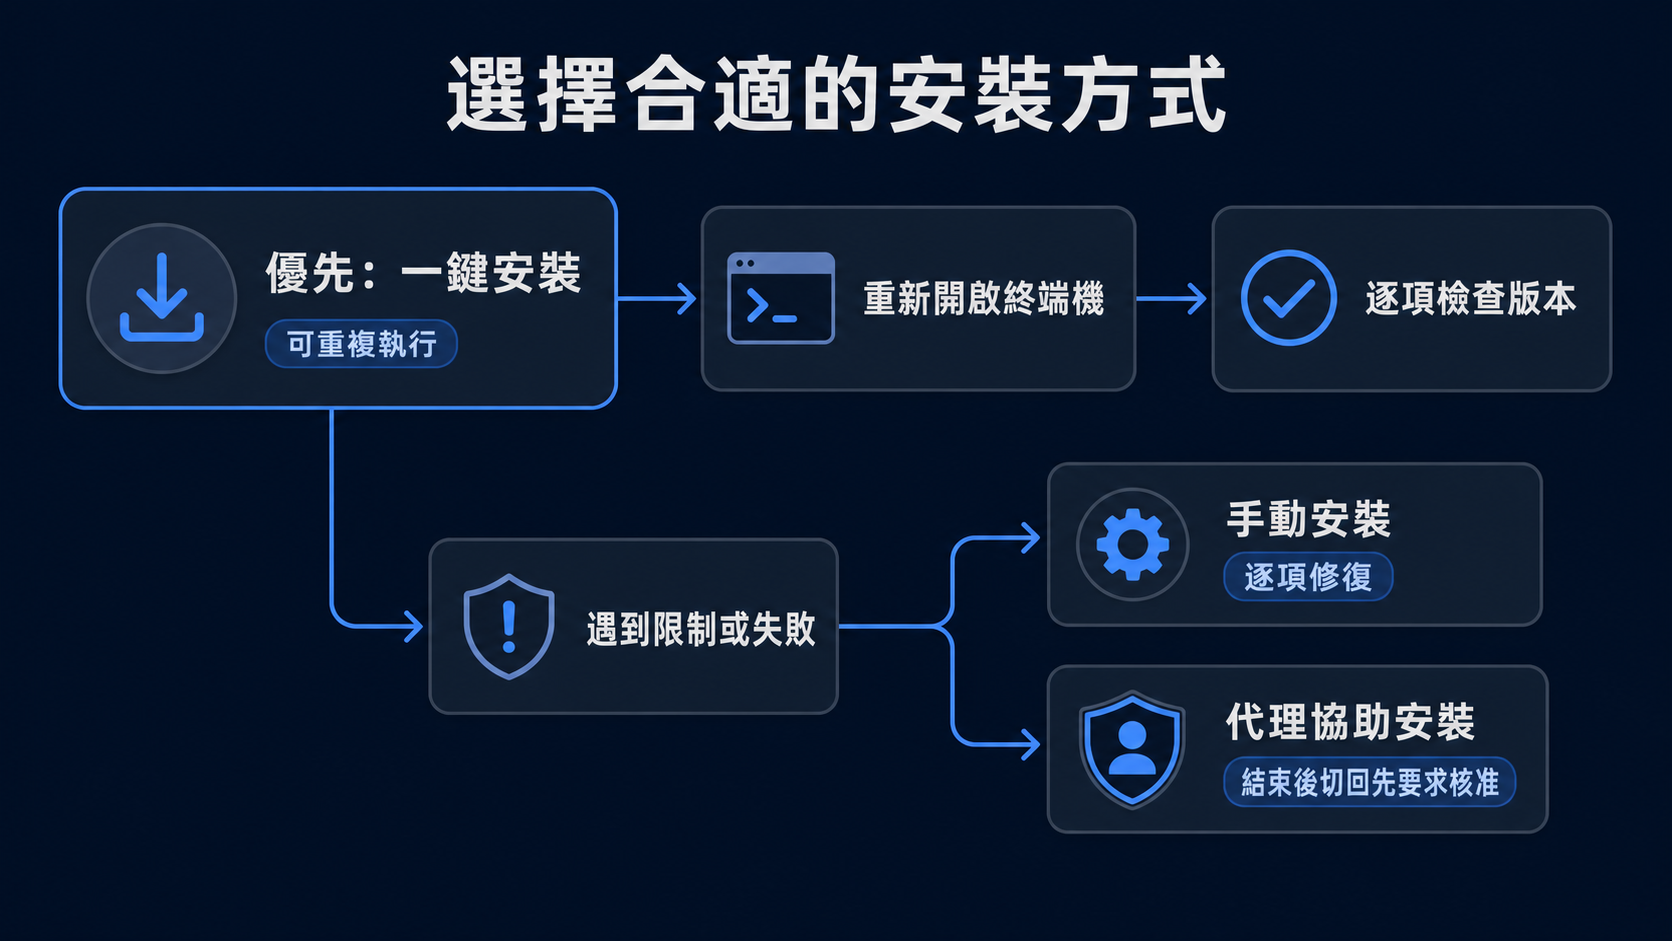
若一鍵安裝失敗,或教師的筆電受學校 IT 權限限制,可改用手動安裝。建議仍優先使用 winget 指令;若 winget 不可用,再從官方下載頁面安裝。
| 工具 | 官方下載/說明 | 建議指令或手動操作 |
|---|---|---|
| App Installer / winget | https://learn.microsoft.com/windows/msix/app-installer/install-update-app-installer | Windows 11 通常已內建。若winget --version 無法執行,請從 Microsoft Store 安裝或更新 App Installer。 |
| ChatGPT 桌面 app | OpenAI:ChatGPT desktop app for Windows | winget install --id 9PLM9XGG6VKS --source msstore,或從 Microsoft Store 安裝。安裝後開啟 app,使用 ChatGPT 帳號登入。 |
| VS Code | https://code.visualstudio.com/download | winget install --id Microsoft.VisualStudioCode --source winget --exact |
| Git for Windows | https://git-scm.com/downloads/win | winget install --id Git.Git --source winget --exact |
| Node.js LTS + npm | https://nodejs.org/en/download | winget install --id OpenJS.NodeJS.LTS --source winget --exact |
| uv | https://docs.astral.sh/uv/getting-started/installation/ | winget install --id astral-sh.uv --source winget --exact |
GitHub CLI (gh) |
https://cli.github.com/ | winget install --id GitHub.cli --source winget --exact |
| Codex CLI | https://developers.openai.com/codex/cli | 安裝 Node.js 後執行npm install -g "@openai/codex",再執行 codex 登入。 |
VS Code 擴充套件可在 VS Code 左側 Extensions 視窗搜尋安裝,也可在終端機逐行執行:
code --install-extension ms-python.python
code --install-extension ms-toolsai.jupyter
code --install-extension eamodio.gitlens
code --install-extension dbaeumer.vscode-eslint
code --install-extension openai.chatgpt
手動安裝後,同樣需要關閉並重新開啟終端機,再執行版本檢查:
code --version
git --version
node --version
npm --version
uv --version
gh --version
codex --version
安裝方式二:透過 AI Agent Prompt 安裝(ChatGPT Work,完整存取權)
除了執行批次檔或手動安裝,也可以直接在 ChatGPT 桌面 app 中改用自然語言,讓 AI Agent 自行檢查筆電上缺少哪些工具、依序安裝並回報結果。
⚠️ 完整存取權(Full access)會讓 Agent 不經逐步核准就執行終端機指令,安裝流程結束後請切回先要求核准(Ask for approval)。
建議操作:
- 開啟 ChatGPT 桌面 app,選擇 ChatGPT,再切換到 Work。
- 在工作設定中把存取層級改成完整存取權(Full access)。
- 貼上下列 prompt 並送出,全程留意輸出內容:
我使用的是 Windows 11 筆電,具備系統管理員權限,已安裝 App Installer (winget)。
請幫我檢查並安裝以下開發工具,若已安裝則略過,全部安裝完成後請執行版本檢查指令並回報結果:

1. VS Code(winget id: Microsoft.VisualStudioCode)
2. Git for Windows(winget id: Git.Git)
3. Node.js LTS + npm(winget id: OpenJS.NodeJS.LTS)
4. uv(winget id: astral-sh.uv)
5. GitHub CLI(winget id: GitHub.cli)
6. Codex CLI(先確認 Node.js 已安裝,再執行 npm install -g "@openai/codex")
7. 以下 VS Code 擴充套件:
   - ms-python.python
   - ms-toolsai.jupyter
   - eamodio.gitlens
   - dbaeumer.vscode-eslint
   - openai.chatgpt

安裝規則:
- 每一項工具在安裝前先檢查是否已存在(例如執行「工具 --version」或「winget list --id ...」),已安裝就跳過,不要重複安裝。
- 使用 winget 安裝時加上 --source winget --exact(VS Code 擴充套件改用 code --install-extension)。
- 全部安裝完成後,開新的終端機視窗,依序執行下列指令並把結果貼給我:
  code --version
  git --version
  node --version
  npm --version
  uv --version
  gh --version
  codex --version
- 若任何一項安裝失敗,請停下來告訴我錯誤訊息,不要略過或用其他方式繞過。
- 不要安裝清單以外的軟體,也不要修改系統設定或使用者帳戶權限。
Agent 執行完成後,請比對輸出結果與上方「安裝的工具」表格,確認每個指令都能顯示版本號;若有工具檢查失敗,可回到「安裝方式一:手動下載與安裝必要工具」單獨修復。
安裝方式三:使用 module1-setup-windows.bat 一鍵安裝
優先使用本模組提供的 module1-setup-windows.bat。這個批次檔會檢查 winget,再依序安裝 VS Code、Git、Node.js LTS、uv、GitHub CLI、ChatGPT 桌面 app、Codex CLI 與常用 VS Code 擴充套件。腳本可重複執行;已安裝的項目會自動略過。
建議操作:
- 下載 module1-setup-windows.bat,或將檔案放到容易找到的位置,例如
Downloads。 - 以滑鼠雙擊執行,或在 PowerShell 執行:
& "$HOME\Downloads\module1-setup-windows.bat"
- 若使用 Command Prompt,執行:
"%USERPROFILE%\Downloads\module1-setup-windows.bat"
- 腳本結束後,關閉並重新開啟 PowerShell 或 Command Prompt,讓 PATH 設定生效。
- 重新執行下列檢查指令,確認主要工具都能被系統找到:
code --version
git --version
node --version
npm --version
uv --version
gh --version
codex --version
若腳本顯示 winget not found,請先安裝或更新 Windows 的 App Installer,完成後再重新執行批次檔。

申請 GitHub 帳號與加入 GitHub Education(免費 GitHub Copilot)
在校生與大專校院教師都可以免費申請 GitHub 帳號,並透過 GitHub Education(GitHub Global Campus)驗證在學/在職身份後,取得原本需付費的 GitHub Copilot Pro 等工具的教育免費額度。建議在正式上課前,先完成以下三個步驟。
1. 申請 GitHub 帳號
- 開啟瀏覽器前往 https://github.com/join。
- 輸入 Email:建議優先使用學校核發的 edu 信箱(例如 xxx@校名.edu.tw),之後申請 GitHub Education 較容易自動通過驗證;暫時沒有學校信箱也可先用個人信箱註冊,稍後在 GitHub Education 流程中再補驗證。
- 設定密碼、選擇 Username,完成人機驗證後,至信箱收取驗證信並完成帳號驗證。
- 登入後建議立即開啟兩步驟驗證 (2FA),並到 Settings → Emails 把學校信箱加入帳號 (Add email address),方便之後驗證使用。
2. 加入 GitHub Education(GitHub Global Campus)
GitHub Education 依身份分成兩種申請入口:學生使用 Student Developer Pack,教師使用 Teacher/Educator Benefits。審核通過後,帳號會顯示已驗證的教育身份,即可免費使用 GitHub Copilot Pro 等原本付費的功能。
| 身份 | 申請入口 | 主要福利 |
|---|---|---|
| 在校學生 | education.github.com/pack | GitHub Copilot Pro 免費、GitHub Pro 帳號功能,以及多項開發工具的教育優惠 |
| 大專校院教師 | education.github.com/teachers | GitHub Copilot Pro 免費、GitHub Classroom 教學工具,可建立課程與作業 repository |
申請流程:
- 以剛申請(或既有)的 GitHub 帳號登入。
- 前往 education.github.com,依身份點選「Get student benefits」或「Get teacher benefits」。
- 選擇所屬學校;若清單中找不到學校,可手動輸入學校中英文名稱。
- 選擇驗證方式:使用學校 edu 信箱通常可自動驗證(約數分鐘完成);沒有 edu 信箱則改用文件驗證,上傳學生證、在學證明、教職員證或聘書等可辨識姓名、學校與日期的清晰照片或掃描檔。
- 送出後留意 GitHub 註冊信箱的通知信,審核時間依驗證方式不同,由數分鐘到數個工作天不等。
- 審核通過後回到 education.github.com,確認狀態顯示「已驗證」(Verified)。
教師身份審核有時需要人工複核,較學生審核耗時;若超過一週未有回覆,可透過 GitHub Education 的 Support 表單查詢進度。學生若畢業、教師若異動離職,福利到期後需重新驗證才能延續使用。
3. 啟用並確認 GitHub Copilot 免費額度
- 前往 github.com/settings/copilot,確認方案已顯示為教育免費授權 (Copilot Pro via GitHub Education)。
- 在 VS Code 安裝 GitHub Copilot 與 GitHub Copilot Chat 擴充套件,並用同一個已驗證的 GitHub 帳號登入:
code --install-extension GitHub.copilot
code --install-extension GitHub.copilot-chat
- 開啟任一程式檔案,確認 Copilot 能提供程式碼建議;也可在 Copilot Chat 視窗發問,確認能正常回應。
4. 常見問題
- 學校信箱不是 .edu 結尾:仍可申請,改用文件驗證即可,GitHub Education 不限定信箱網域。
- 審核被拒絕或卡住:確認上傳的文件清楚可辨識姓名、學校與日期;必要時更換其他在學/在職證明文件重新送出。
- 帳號原本已有付費 Copilot 訂閱:GitHub Education 核准後通常可折抵,若有疑問可在 GitHub 帳單頁面確認扣款狀態。
- 畢業或離職之後:GitHub Education 福利會在身份到期後停止,需維持在學/在職狀態,並依 GitHub 提示重新驗證。
實作流程 (Hands-on Activities)
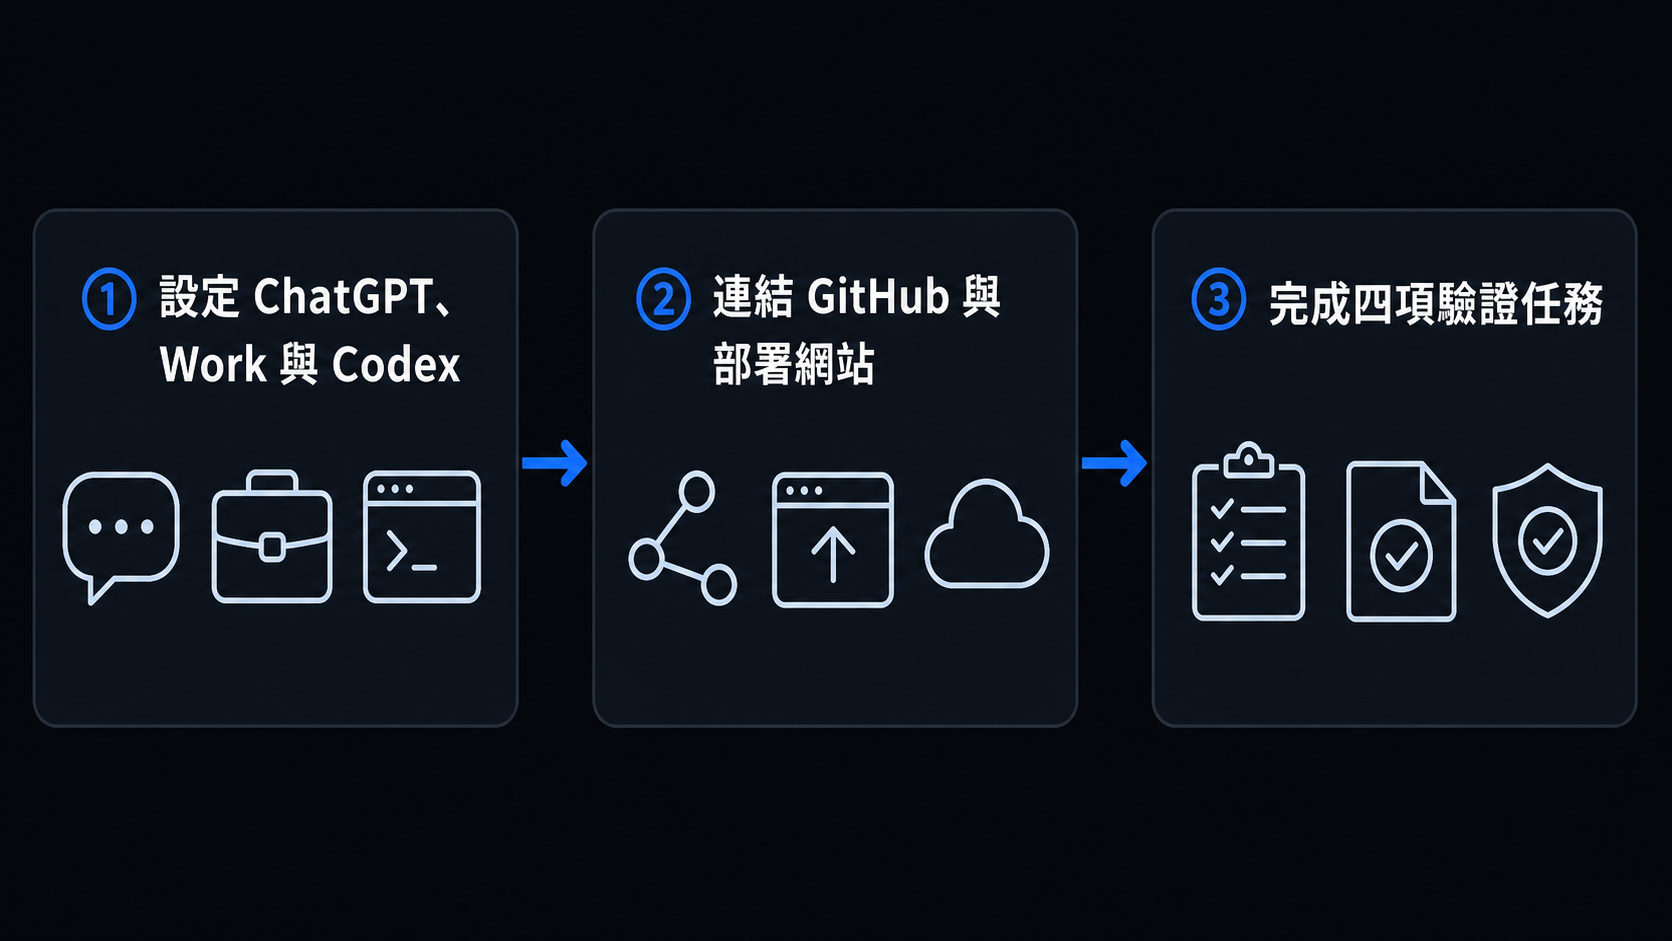
1. 設定 ChatGPT、Work 與 Codex
- 開啟 ChatGPT 桌面 app 並登入。需要快速問答時選 Chat;要完成研究、文件或可審查的多步驟成果時,先選 ChatGPT,再切換到 Work;要處理課程 project、程式碼、指令與 diff 時,從產品選單選 Codex。
- 在 Codex 先開啟這次課程唯一的 project 資料夾。傳送第一個任務前,選擇先要求核准(Ask for approval);不要預設開啟完整存取權(Full access)。完成後檢查核准要求、diff 與輸出檔案。
- 需要終端機工作流程時,再執行
codex並以瀏覽器登入可使用 Codex 的 ChatGPT 帳號;同一帳號可同時用於 VS Code 的 Codex 擴充套件。 - 若後續任務需要操作瀏覽器,讓 AI Agent 依任務需求自行安裝與設定對應工具即可;本模組不把瀏覽器自動化外掛列為預先安裝項目。
- 執行 guided「Hello, AI Agent」任務 (請 Agent 建立一個
hello.txt),確認 AI Agent 能接收指令、產生檔案並回報結果。
2. 連結 GitHub 與部署 GitHub Pages
- 執行
gh auth login,全程以瀏覽器與一次性代碼登入,不需產生 SSH 金鑰或於終端機輸入密碼,並一次設定好 git 認證與提交身分 (user.name / user.email)。 - 練習
gh repo clone下載專案,以及用gh repo create … --push與 GitHub Pages 把靜態網站發佈成公開網址。
3. 四項驗證任務 (Verification Tasks)
| 任務 | 內容 | 驗證重點 |
|---|---|---|
| Python 驗證 | 以 uv 建立專案並安裝 openpyxl、python-docx,讀取 Excel、整理資料並輸出新的 Excel 檔案 | 套件與檔案處理可運作 |
| Word 驗證 | 讀取 Word 文件內容,並產生一份修改後的 Word 檔案 | Office 文件處理可運作 |
| JavaScript 驗證 | 以npx http-server 啟動簡單的 local web server,確認 client-side 與 server-side 程式正常執行 |
Node.js 與 local host 可運作 |
| Codex 驗證 | 請 Codex 建立簡單文字檔、修改範例程式或整理指定資料 | AI Agent 可讀寫工作區檔案並回報結果 |
Windows 11 Vibe Coding and AI Agent Environment Setup
This module prepares a Vibe Coding and AI Agent environment on a Windows 11 laptop. Install the ChatGPT desktop app first, then use the setup script for the developer tools. Finally, choose Chat, ChatGPT Work, or Codex for the appropriate verification task.
Learning Objectives
After this module, participants can:
- Set up a working Vibe Coding and AI Agent environment on a Windows 11 laptop.
- Choose Chat, ChatGPT Work, or Codex in the ChatGPT desktop app for the task at hand.
- Use VS Code with Codex CLI and the Codex extension to create, edit, and review code.
- Use uv and npm to manage Python and Node.js packages and project environments.
- Use the GitHub CLI (
gh) to sign in to GitHub through the browser, then clone, push, and deploy to GitHub Pages. - Use the checklist to verify the environment independently and troubleshoot common setup issues.
Prerequisites
| Item | Description |
|---|---|
| Personal laptop | Windows 11, with administrator (software installation) permissions |
| Network | Internet access to download installers and reach AI services |
| ChatGPT account | A ChatGPT account with Codex access; available features vary by plan, workspace, and rollout status. The CLI and VS Code extension can use the same sign-in. |
| GitHub account | Used to sign in to the GitHub CLI, clone the project, and deploy GitHub Pages |
| Basic skills | Comfortable opening a terminal and typing commands |
Minimum Computer Requirements
This workshop keeps VS Code, Node.js, Python, a terminal, and browser sign-in pages open at the same time, so the laptop should meet at least the specs below. The "Recommended" column marks the threshold for a smoother experience.
| Item | Minimum | Recommended |
|---|---|---|
| Operating system | Windows 11 (64-bit) with App Installer (winget) installed | Windows 11, fully updated |
| Processor | 64-bit x64 dual-core | Quad-core or better |
| Memory (RAM) | 8 GB | 16 GB |
| Free disk space | 10 GB | 20 GB or more |
| Permissions | Administrator permissions (can install software, allow UAC prompts) | Same as minimum |
| Network | Stable broadband with access to GitHub and AI services | Same as minimum |
| Browser | Microsoft Edge or Chrome (for sign-in flows) | Same as minimum |
8 GB of RAM is enough to complete every task, but 16 GB is noticeably smoother once VS Code, a browser, and several terminals are open at the same time. The disk-space estimate includes the toolchain plus each project's node_modules and Python packages.
Toolchain
The Windows 11 setup script and follow-up guide prepare these tools on the laptop:
| Tool | Purpose |
|---|---|
| VS Code | Code editor; also the main window for working with the AI agent later |
| Git | Version control tool used by many AI tools |
| Node.js + npm | JavaScript runtime, used to start a local web server and install Codex CLI |
| uv (Python) | Manages Python and packages; installing, updating, and removing them is simple |
| ChatGPT desktop app | The Windows entry point for Chat, ChatGPT Work, and Codex. It can open projects, show changes, and provide an integrated terminal. |
| Codex CLI (terminal workflow) | OpenAI's command-line agent for course exercises that work directly in a project. Sign in with a ChatGPT account that has Codex access. |
| GitHub CLI (gh) | Sign in to GitHub through the browser; clone, push, and deploy to GitHub Pages |
| VS Code extensions | Python, Jupyter, GitLens, ESLint, and the Codex coding agent (openai.chatgpt) |
Install Method 1: Manual Download and Installation
If the one-click install fails, or the laptop is restricted by school IT policy, install manually instead. Still try the winget command first; if winget isn't available, install from the official download pages.
| Tool | Official Download / Notes | Recommended Command or Manual Steps |
|---|---|---|
| App Installer / winget | https://learn.microsoft.com/windows/msix/app-installer/install-update-app-installer | Windows 11 usually includes this. If winget --version doesn't run, install or update App Installer from the Microsoft Store. |
| ChatGPT desktop app | OpenAI: ChatGPT desktop app for Windows | Run winget install --id 9PLM9XGG6VKS --source msstore, or install it from Microsoft Store. Then open the app and sign in. |
| VS Code | https://code.visualstudio.com/download | winget install --id Microsoft.VisualStudioCode --source winget --exact |
| Git for Windows | https://git-scm.com/downloads/win | winget install --id Git.Git --source winget --exact |
| Node.js LTS + npm | https://nodejs.org/en/download | winget install --id OpenJS.NodeJS.LTS --source winget --exact |
| uv | https://docs.astral.sh/uv/getting-started/installation/ | winget install --id astral-sh.uv --source winget --exact |
GitHub CLI (gh) |
https://cli.github.com/ | winget install --id GitHub.cli --source winget --exact |
| Codex CLI | https://developers.openai.com/codex/cli | After installing Node.js, run npm install -g "@openai/codex", then run codex to sign in. |
You can install the VS Code extensions by searching in the Extensions panel, or run these commands one by one in a terminal:
code --install-extension ms-python.python
code --install-extension ms-toolsai.jupyter
code --install-extension eamodio.gitlens
code --install-extension dbaeumer.vscode-eslint
code --install-extension openai.chatgpt
After a manual install, close and reopen the terminal too, then run the version checks:
code --version
git --version
node --version
npm --version
uv --version
gh --version
codex --version
Install Method 2: Install via an AI Agent Prompt (ChatGPT Work, Full Access)
Instead of running the batch file or installing manually, you can also open the ChatGPT desktop app and use a natural-language prompt so the agent checks what is missing on the laptop, installs it, and reports back.
⚠️ Full access lets the agent run terminal commands without asking for approval on each step. Switch back to Ask for approval once the install is finished.
Suggested steps:
- Open the ChatGPT desktop app, choose ChatGPT, then switch to Work.
- In the task settings, change the access level to Full access.
- Paste the prompt below and send it, and watch the output the whole time:
I'm on a Windows 11 laptop with administrator rights, and App Installer (winget) is already installed.
Please check and install the following developer tools, skipping anything already installed. After everything is installed, run the version-check commands and report the results back to me:

1. VS Code (winget id: Microsoft.VisualStudioCode)
2. Git for Windows (winget id: Git.Git)
3. Node.js LTS + npm (winget id: OpenJS.NodeJS.LTS)
4. uv (winget id: astral-sh.uv)
5. GitHub CLI (winget id: GitHub.cli)
6. Codex CLI (confirm Node.js is installed first, then run npm install -g "@openai/codex")
7. These VS Code extensions:
   - ms-python.python
   - ms-toolsai.jupyter
   - eamodio.gitlens
   - dbaeumer.vscode-eslint
   - openai.chatgpt

Rules:
- Before installing each tool, check whether it already exists (e.g. run "tool --version" or "winget list --id ..."); skip it if it's already installed, don't reinstall.
- When using winget, add --source winget --exact (for VS Code extensions, use code --install-extension instead).
- After everything is installed, open a new terminal window, run the following commands in order, and paste the results back to me:
  code --version
  git --version
  node --version
  npm --version
  uv --version
  gh --version
  codex --version
- If any install step fails, stop and tell me the error message; don't skip it or work around it another way.
- Don't install anything outside this list, and don't change system settings or user account permissions.
Once the agent finishes, compare its output against the Toolchain table above to confirm each command prints a version number. If a check fails, go back to "Install Method 1: Manual Download and Installation" to fix that tool individually.
Install Method 3: One-Click Setup with module1-setup-windows.bat
Start with the supplied module1-setup-windows.bat. It checks winget, then installs VS Code, Git, Node.js LTS, uv, GitHub CLI, the ChatGPT desktop app, Codex CLI, and common VS Code extensions. The script is safe to run again; installed items are skipped.
Suggested steps:
- Download module1-setup-windows.bat, or move the file somewhere easy to find, such as
Downloads. - Double-click to run it, or run it in PowerShell:
& "$HOME\Downloads\module1-setup-windows.bat"
- If using Command Prompt, run:
"%USERPROFILE%\Downloads\module1-setup-windows.bat"
- After the script finishes, close and reopen PowerShell or Command Prompt so the PATH changes take effect.
- Run the following checks again to confirm the system can find each tool:
code --version
git --version
node --version
npm --version
uv --version
gh --version
codex --version
If the script prints winget not found, install or update Windows App Installer first, then run the batch file again.
Apply for a GitHub Account and Join GitHub Education (Free GitHub Copilot)
Both students and college faculty can apply for a free GitHub account, then verify their academic status through GitHub Education (GitHub Global Campus) to unlock the education tier of GitHub Copilot Pro and other normally paid tools at no cost. Complete the three steps below before class starts.
1. Create a GitHub Account
- Open a browser and go to https://github.com/join.
- Enter an email address. Using your school-issued edu email (e.g., xxx@your-school.edu.tw) makes the later GitHub Education verification more likely to auto-approve. If you don't have one yet, sign up with a personal email and verify later during the GitHub Education application.
- Set a password, choose a username, complete the human-verification puzzle, then check your inbox and confirm the verification email.
- After signing in, turn on two-factor authentication (2FA), and add your school email under Settings → Emails (Add email address) so it's ready for verification.
2. Join GitHub Education (GitHub Global Campus)
GitHub Education has two application paths: the Student Developer Pack for students, and Teacher/Educator Benefits for faculty. Once verified, the account shows a confirmed academic status and unlocks GitHub Copilot Pro and other paid features for free.
| Role | Application Page | Main Benefits |
|---|---|---|
| Student | education.github.com/pack | Free GitHub Copilot Pro, GitHub Pro account features, and discounts on many developer tools |
| College faculty | education.github.com/teachers | Free GitHub Copilot Pro and GitHub Classroom, for setting up course and assignment repositories |
Application steps:
- Sign in with the GitHub account created above (or an existing one).
- Go to education.github.com and click "Get student benefits" or "Get teacher benefits" depending on your role.
- Select your school; if it isn't listed, type the school name manually.
- Choose a verification method: a school edu email is usually verified automatically within minutes; without one, upload document verification instead — a clear photo or scan of a student ID, enrollment certificate, faculty ID, or employment letter showing your name, school, and date.
- After submitting, watch the inbox tied to your GitHub account for a status update; review time ranges from a few minutes to several business days depending on the verification method.
- Once approved, return to education.github.com and confirm the status shows "Verified."
Faculty verification sometimes needs manual review and can take longer than student verification. If there's no response after a week, check progress through the GitHub Education support form. Benefits expire when a student graduates or a faculty member's employment changes, and re-verification is required to continue.
3. Activate and Confirm Free Copilot Access
- Go to github.com/settings/copilot and confirm the plan shows the education-tier free license (Copilot Pro via GitHub Education).
- Install the GitHub Copilot and GitHub Copilot Chat extensions in VS Code, and sign in with the same verified GitHub account:
code --install-extension GitHub.copilot
code --install-extension GitHub.copilot-chat
- Open any code file to confirm Copilot offers suggestions, or ask a question in the Copilot Chat panel to confirm it responds.
4. Common Issues
- School email doesn't end in .edu: Still fine — use document verification instead. GitHub Education doesn't require a specific email domain.
- Verification rejected or stuck: Make sure the uploaded document clearly shows your name, school, and date; try a different proof of enrollment/employment if needed.
- Already paying for Copilot: Approval usually credits or replaces the paid subscription; check the GitHub billing page if anything looks off.
- After graduating or leaving the school: GitHub Education benefits stop once academic status expires; keep your enrollment/employment current and re-verify as GitHub prompts.
Hands-on Activities
1. Set up ChatGPT Work and Codex
- Open the ChatGPT desktop app and sign in. Use Chat for quick questions; select ChatGPT, then Work for a multi-step, reviewable outcome; select Codex for a course project, code, commands, and diffs.
- In Codex, open only the intended course project folder. Before the first task, choose Ask for approval; do not enable Full access by default. Review approval requests, diffs, and output files.
- For a terminal workflow, run
codexand sign in through the browser with the same ChatGPT account. The VS Code Codex extension can use that account too. - If a later task needs browser automation, let the AI agent install and configure whatever tools it needs on its own; this module doesn't pre-install any browser automation add-ons.
- Run the guided "Hello, AI Agent" task (ask the agent to create a
hello.txtfile) to confirm the AI agent can receive instructions, produce a file, and report back.
2. Connect GitHub and Deploy GitHub Pages
- Run
gh auth loginand sign in entirely through the browser with a one-time code — no SSH keys or passwords typed into the terminal — which also sets up git credentials and your commit identity (user.name / user.email) in one step. - Practice cloning a project with
gh repo clone, and usegh repo create … --pushtogether with GitHub Pages to publish a static site to a public URL.
3. Four Verification Tasks
| Task | Description | What It Verifies |
|---|---|---|
| Python check | Use uv to create a project, install openpyxl and python-docx, read an Excel file, clean up the data, and write a new Excel file | Confirms package installation and file handling work |
| Word check | Read the contents of a Word document and produce a modified Word file | Confirms Office document handling works |
| JavaScript check | Start a simple local web server with npx http-server to confirm client-side and server-side code run correctly |
Confirms Node.js and the local host work |
| Codex check | Ask Codex to create a simple text file, modify a sample script, or organize a specified dataset | Confirms the AI agent can read and write workspace files and report results |